Everything PixelOps does, in the order you'll actually touch it — installing, registering
your copy, and running each of the five tools. Every screenshot below is the real app, and every
before/after image is the real algorithm running, not a mockup.
Windows 10 / 11 · 64-bitNo Photoshop or Python requiredWorks fully offline
Setup
Installing PixelOps
One installer, no extra downloads — the batch-processing engines are bundled in.
Run PixelOps-Setup.exe and approve the Windows permission prompt — installing to Program Files needs it.
Read and accept the license agreement on the next screen. You can't continue without accepting it.
Choose whether to add a desktop shortcut (on by default) — a Start Menu entry is always created.
Click Install, then Finish — tick "Launch PixelOps" to open it immediately.
Why Program Files, not just any folder? It's the standard, trusted location
for Windows software — and it keeps PixelOps' program files separate from your personal settings,
which live in your own user profile instead.
First run on a new PC: Windows may show a "Windows protected your PC" /
Unknown Publisher prompt, since this installer isn't code-signed. Click More info → Run anyway.
This is expected and doesn't affect how the app works.
First launch
Registering PixelOps
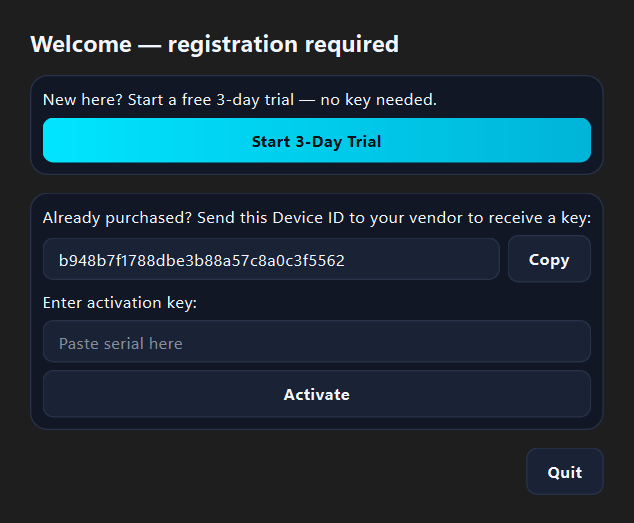
You'll see this screen once, the very first time you open PixelOps. It won't open
without one of these two choices — there's no silent trial running in the background.
New — start a trial
Click Start 3-Day Trial. Nothing to type, no key needed. The countdown starts the moment
you click it, not before.
Already purchased
Copy your Device ID and send it to whoever you bought PixelOps from. They'll send back
an activation key — paste it into the Activate field.
You can switch from trial to a full license at any point — open Settings and
paste your key there. No need to wait for the trial to run out.
Home
Dashboard
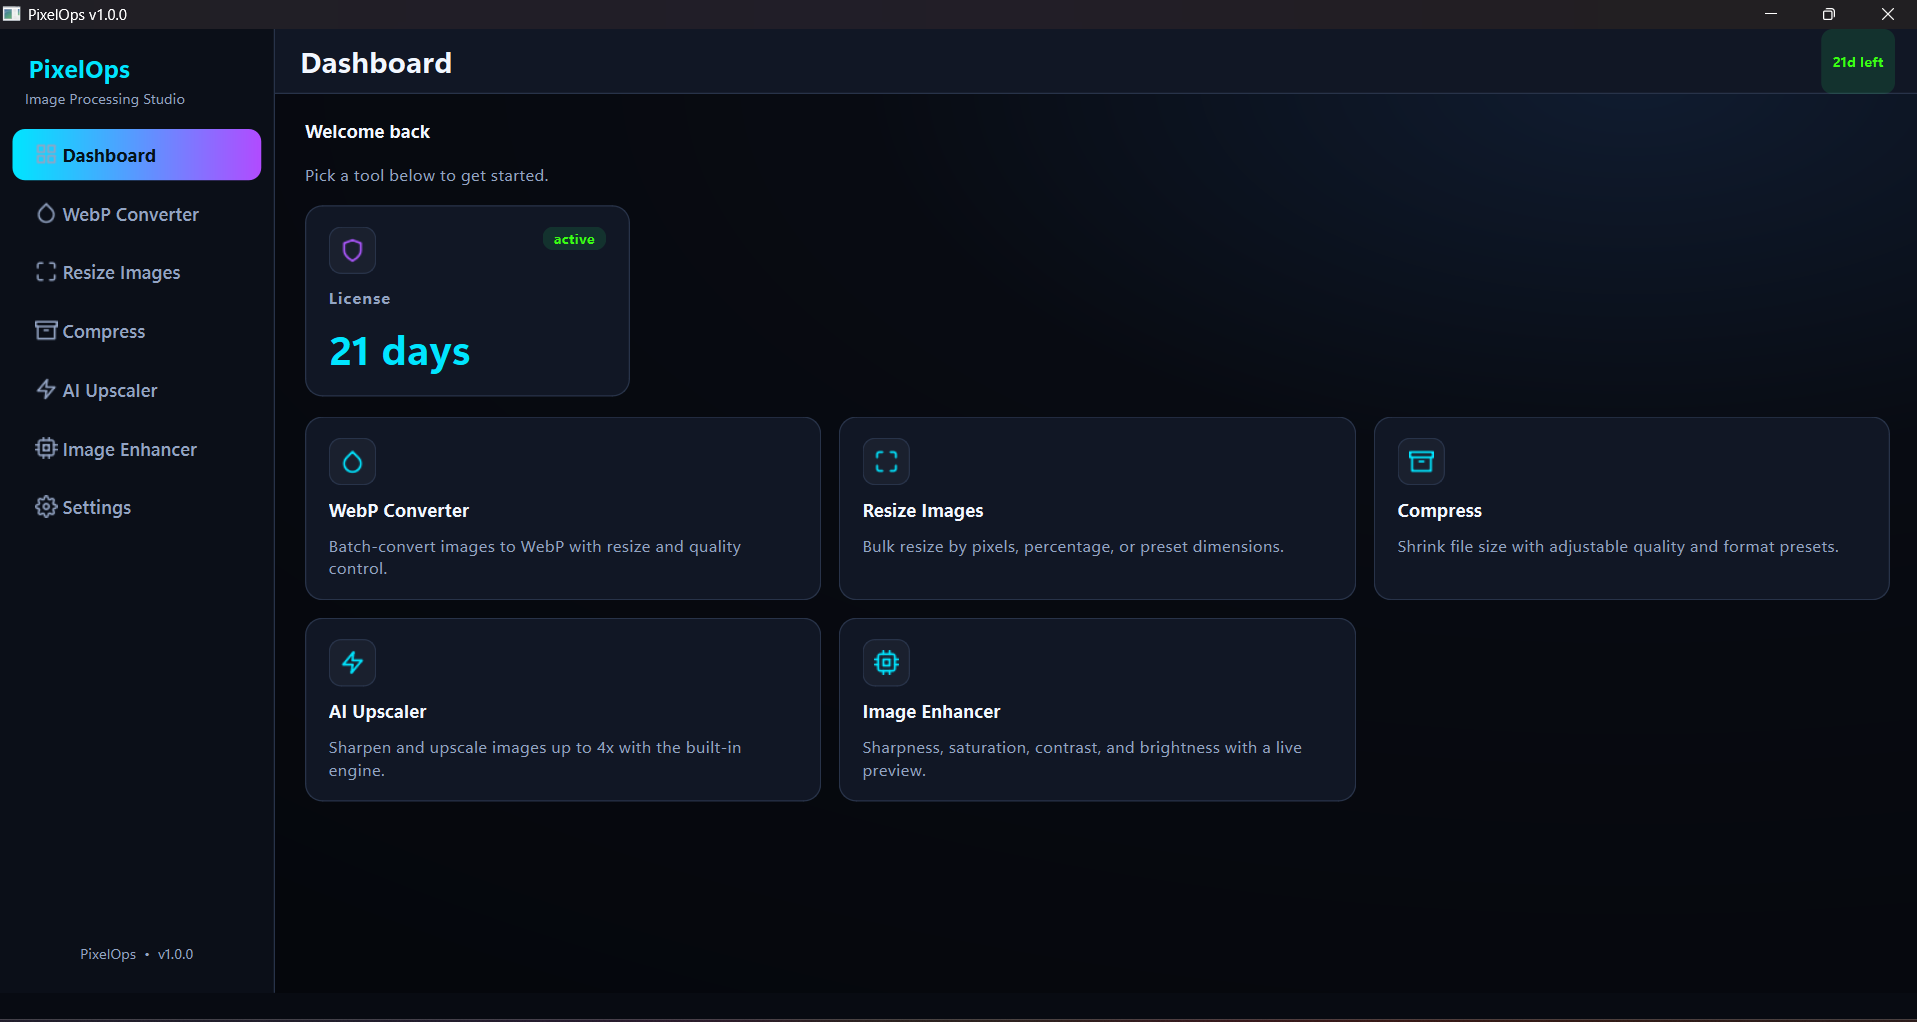
Your license status at a glance, and one click into any tool.
The License card always shows how many days are left on your current trial or key. Click any
tile below it to jump straight into that tool — the same sidebar (five tools, plus Settings) is there
on every page, so you're never more than one click from switching tasks.
Tool 01
WebP Converter
Batch-convert JPG, PNG, BMP, TIFF, or GIF files to WebP — smaller files, same quality,
ready for the web.
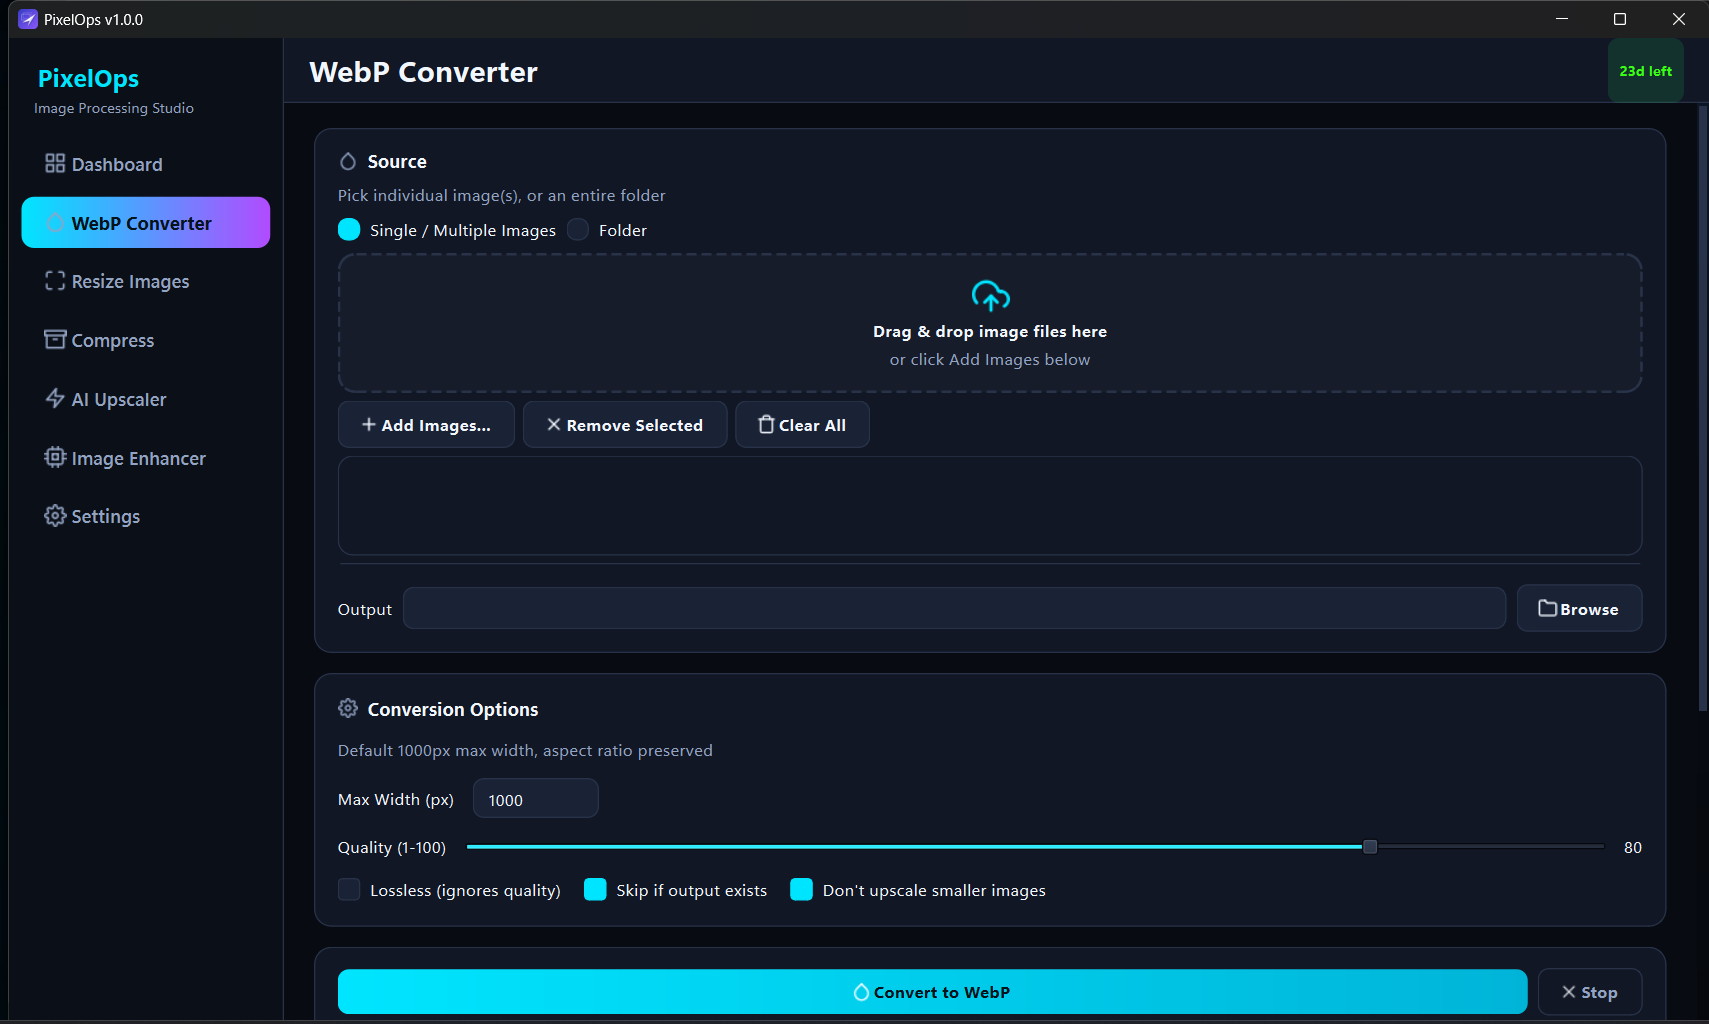
Pick your source — Single / Multiple Images to drop in exact
files, or Folder to convert everything inside a folder (tick Include subfolders
to go recursive).
Set an output folder — where the converted .webp files land.
Adjust Max Width and Quality — images wider than the max are scaled down;
quality trades file size against sharpness. Lossless ignores the quality slider entirely.
Click Convert to WebP — watch progress and per-file results at the bottom
of the page. Stop finishes the current file, then halts.
Every control, explained 10 controls
Single / Multiple Images
Source mode for picking exact files one at a time or via multi-select. Use when you want to convert a specific handful of images, not everything in a folder.
Folder
Source mode that converts every supported image inside a folder you point it at. Use when you have a whole shoot or export batch to process at once.
Include subfolders
Only shown in Folder mode. When on, recurses into every subfolder too, instead of just the top level. Use when your images are organized into dated or categorized subfolders.
Drag & drop zone / Add Images
Drop files onto this area, or click Add Images… to open a file picker. Both add to the same queue.
Remove Selected / Clear All
Remove Selected drops the highlighted row(s) from the queue; Clear All empties it completely. Neither touches files on disk.
Output folder
Where converted .webp files are written. Click Browse to pick a folder — originals are never overwritten by this tool.
Max Width (px)
Images wider than this are scaled down to fit, preserving aspect ratio. Set to 0 to keep every image at its original width.
Quality (1–100)
The main size/sharpness trade-off for lossy WebP. Higher = larger file, less compression artifacting. Ignored when Lossless is on.
Lossless
Compresses without discarding any image data at all. Produces larger files than the Quality slider's lossy mode — use for graphics/screenshots where every pixel matters.
Skip if output exists / Don't upscale smaller images
Skip avoids redoing work on a re-run over the same output folder. Don't upscale prevents a small source image from being stretched larger than it started.
Tool 02
Resize Images
Bulk resize by exact pixels, or by inches/centimeters/millimeters at a target print DPI.
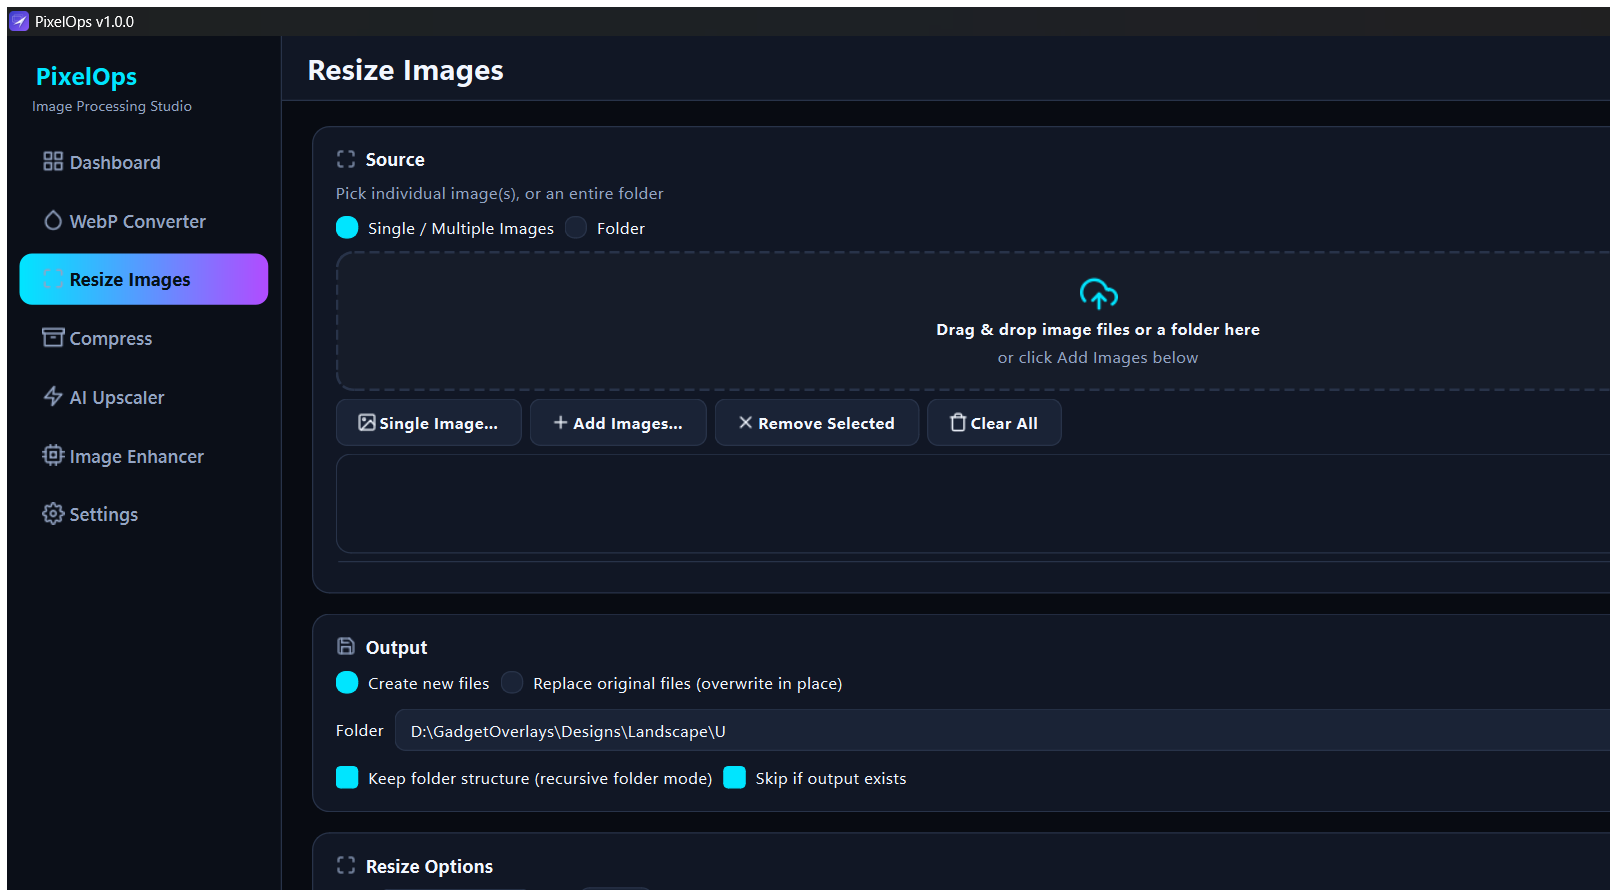
Add your images — same Single/Multiple-or-Folder source pattern as every
other tool in PixelOps, so it's never something you have to relearn.
Choose Create new files or Replace originals — replacing overwrites in
place, so make sure that's really what you want.
Pick a unit — Pixels for exact dimensions, or Inches/cm/mm with a DPI value
for print sizing.
Set Width and Height — with Lock aspect ratio on, height is
computed automatically per image so nothing stretches.
Every control, explained 9 controls
Single / Multiple / Folder
Same source-mode pattern as every tool in PixelOps — exact files, or an entire folder (with an Include subfolders option in Folder mode).
Create new files
Writes resized copies to the output folder, leaving your originals untouched. The safe default.
Replace originals (overwrite in place)
Resizes files directly where they are, no output folder needed. There is no undo — make sure you have a backup if you're not certain.
Output folder
Only relevant in Create-new-files mode. Where the resized copies land.
Keep folder structure
In Folder mode, mirrors your input folder's subfolder layout inside the output folder instead of flattening everything into one place.
Unit
Pixels for exact on-screen dimensions. Inches / cm / mm for print sizing — pairs with the DPI field below to compute the right pixel size.
Width / Height
Target size in whichever unit is selected. With Lock aspect ratio on, only one needs to be set — the other is computed per image automatically.
DPI
Only shown for print units (in/cm/mm). Sets the pixels-per-inch density used to convert your physical size into an actual pixel count — 300 is standard for print.
Skip if output exists
Don't redo a file that's already been resized into the output folder on a previous run.
Tool 03
Compress
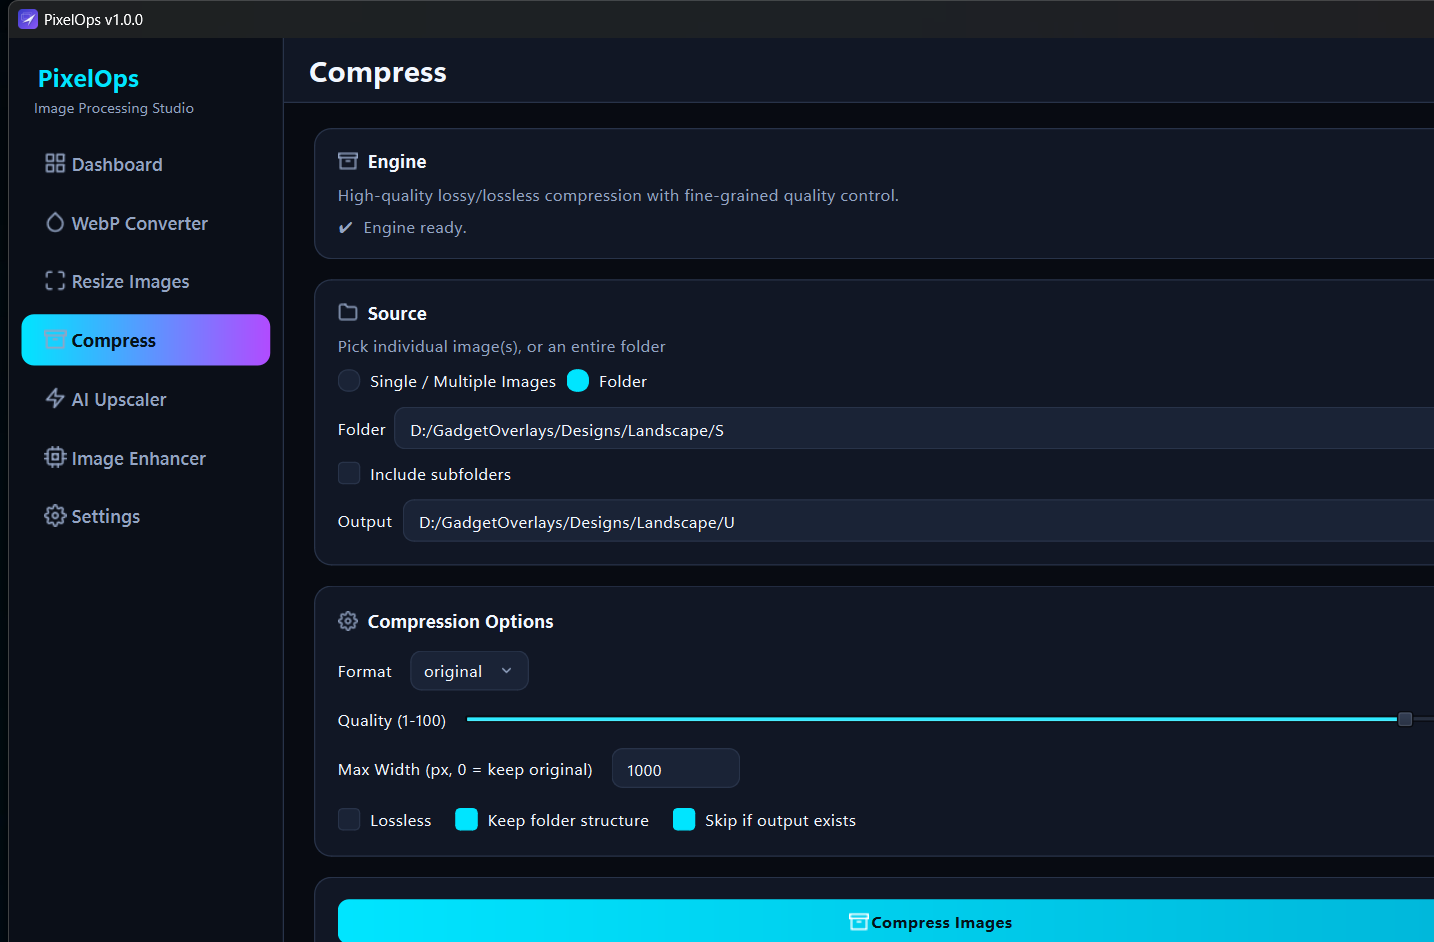
Shrink file size with fine-grained quality control — the built-in engine reports
"Engine ready" the moment it's available, with nothing to configure.
Format
Leave it on original to keep each file's own format, or force everything to jpg,
png, webp, or avif.
Quality & Lossless
The Quality slider is your main size/sharpness dial. Lossless compresses without
throwing away any image data.
Max Width
Optional — set above 0 to downscale wide images as part of the same pass, on top of compression.
Keep folder structure
In Folder mode, mirrors your input folder's subfolder layout inside the output folder.
Every control, explained 9 controls
Engine ready
A status line, not a control — confirms the bundled compression engine loaded correctly. If it ever says something else, reinstalling PixelOps fixes it.
Single / Multiple / Folder
The usual source-mode toggle, with Include subfolders available in Folder mode.
Output folder
Where compressed files are written — always a separate output, this tool never overwrites originals in place.
Format
original keeps each file's own format. Force everything to jpg / png / webp / avif instead if you need a single consistent output format.
Quality (1–100)
Your main size/sharpness dial for lossy compression. Lower = smaller files, more visible artifacting.
Max Width (px, 0 = keep original)
Optional extra size cut — downscales wide images as part of the same compression pass. Leave at 0 to only compress, never resize.
Lossless
Compresses without throwing away any image data — the Quality slider is ignored while this is on.
Keep folder structure
In Folder mode, mirrors your input folder's subfolder layout inside the output folder.
Skip if output exists
Don't recompress a file that already has a matching output from a previous run.
Tool 04
AI Upscaler
Sharpen and enlarge images up to 4x using the built-in upscaling engine — pick a
preset, not a model name.
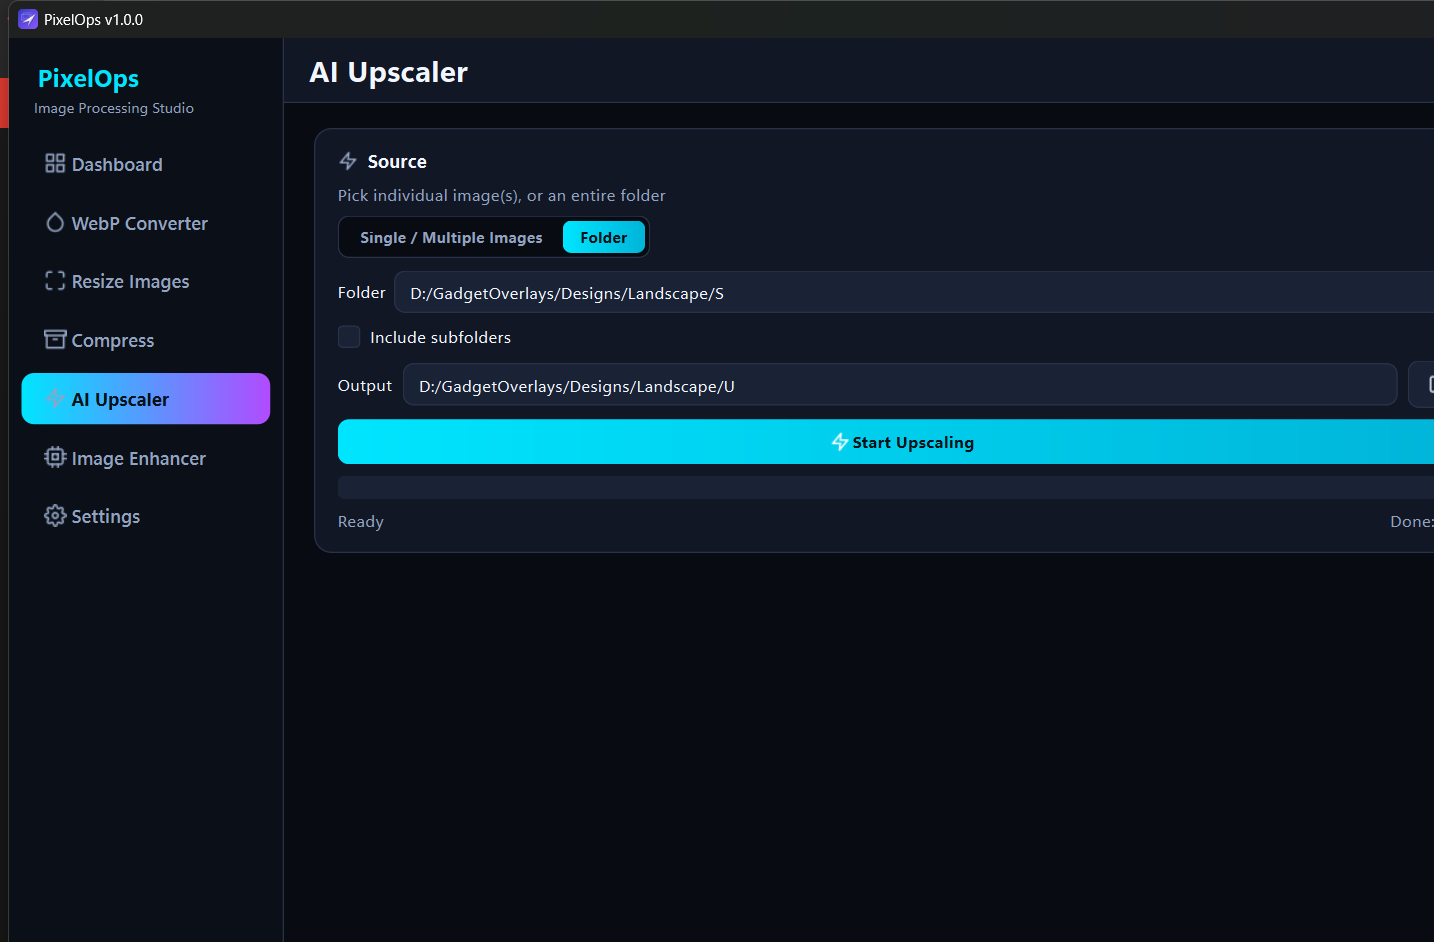
Folder mode — the source card sizes itself to its content instead of leaving a dead gap.
Preset
Best for
Sharp Detail (4x)
Product shots, text, fine edges — maximum crispness
Balanced Quality (4x)
Photos and general images — smoother, more natural results (default)
Set the Scale (2x/3x/4x) and output Format, then add images and click Start
Upscaling. Leave Tile at 0 and GPU on auto unless you're troubleshooting
a specific graphics card — the defaults work for almost everyone.
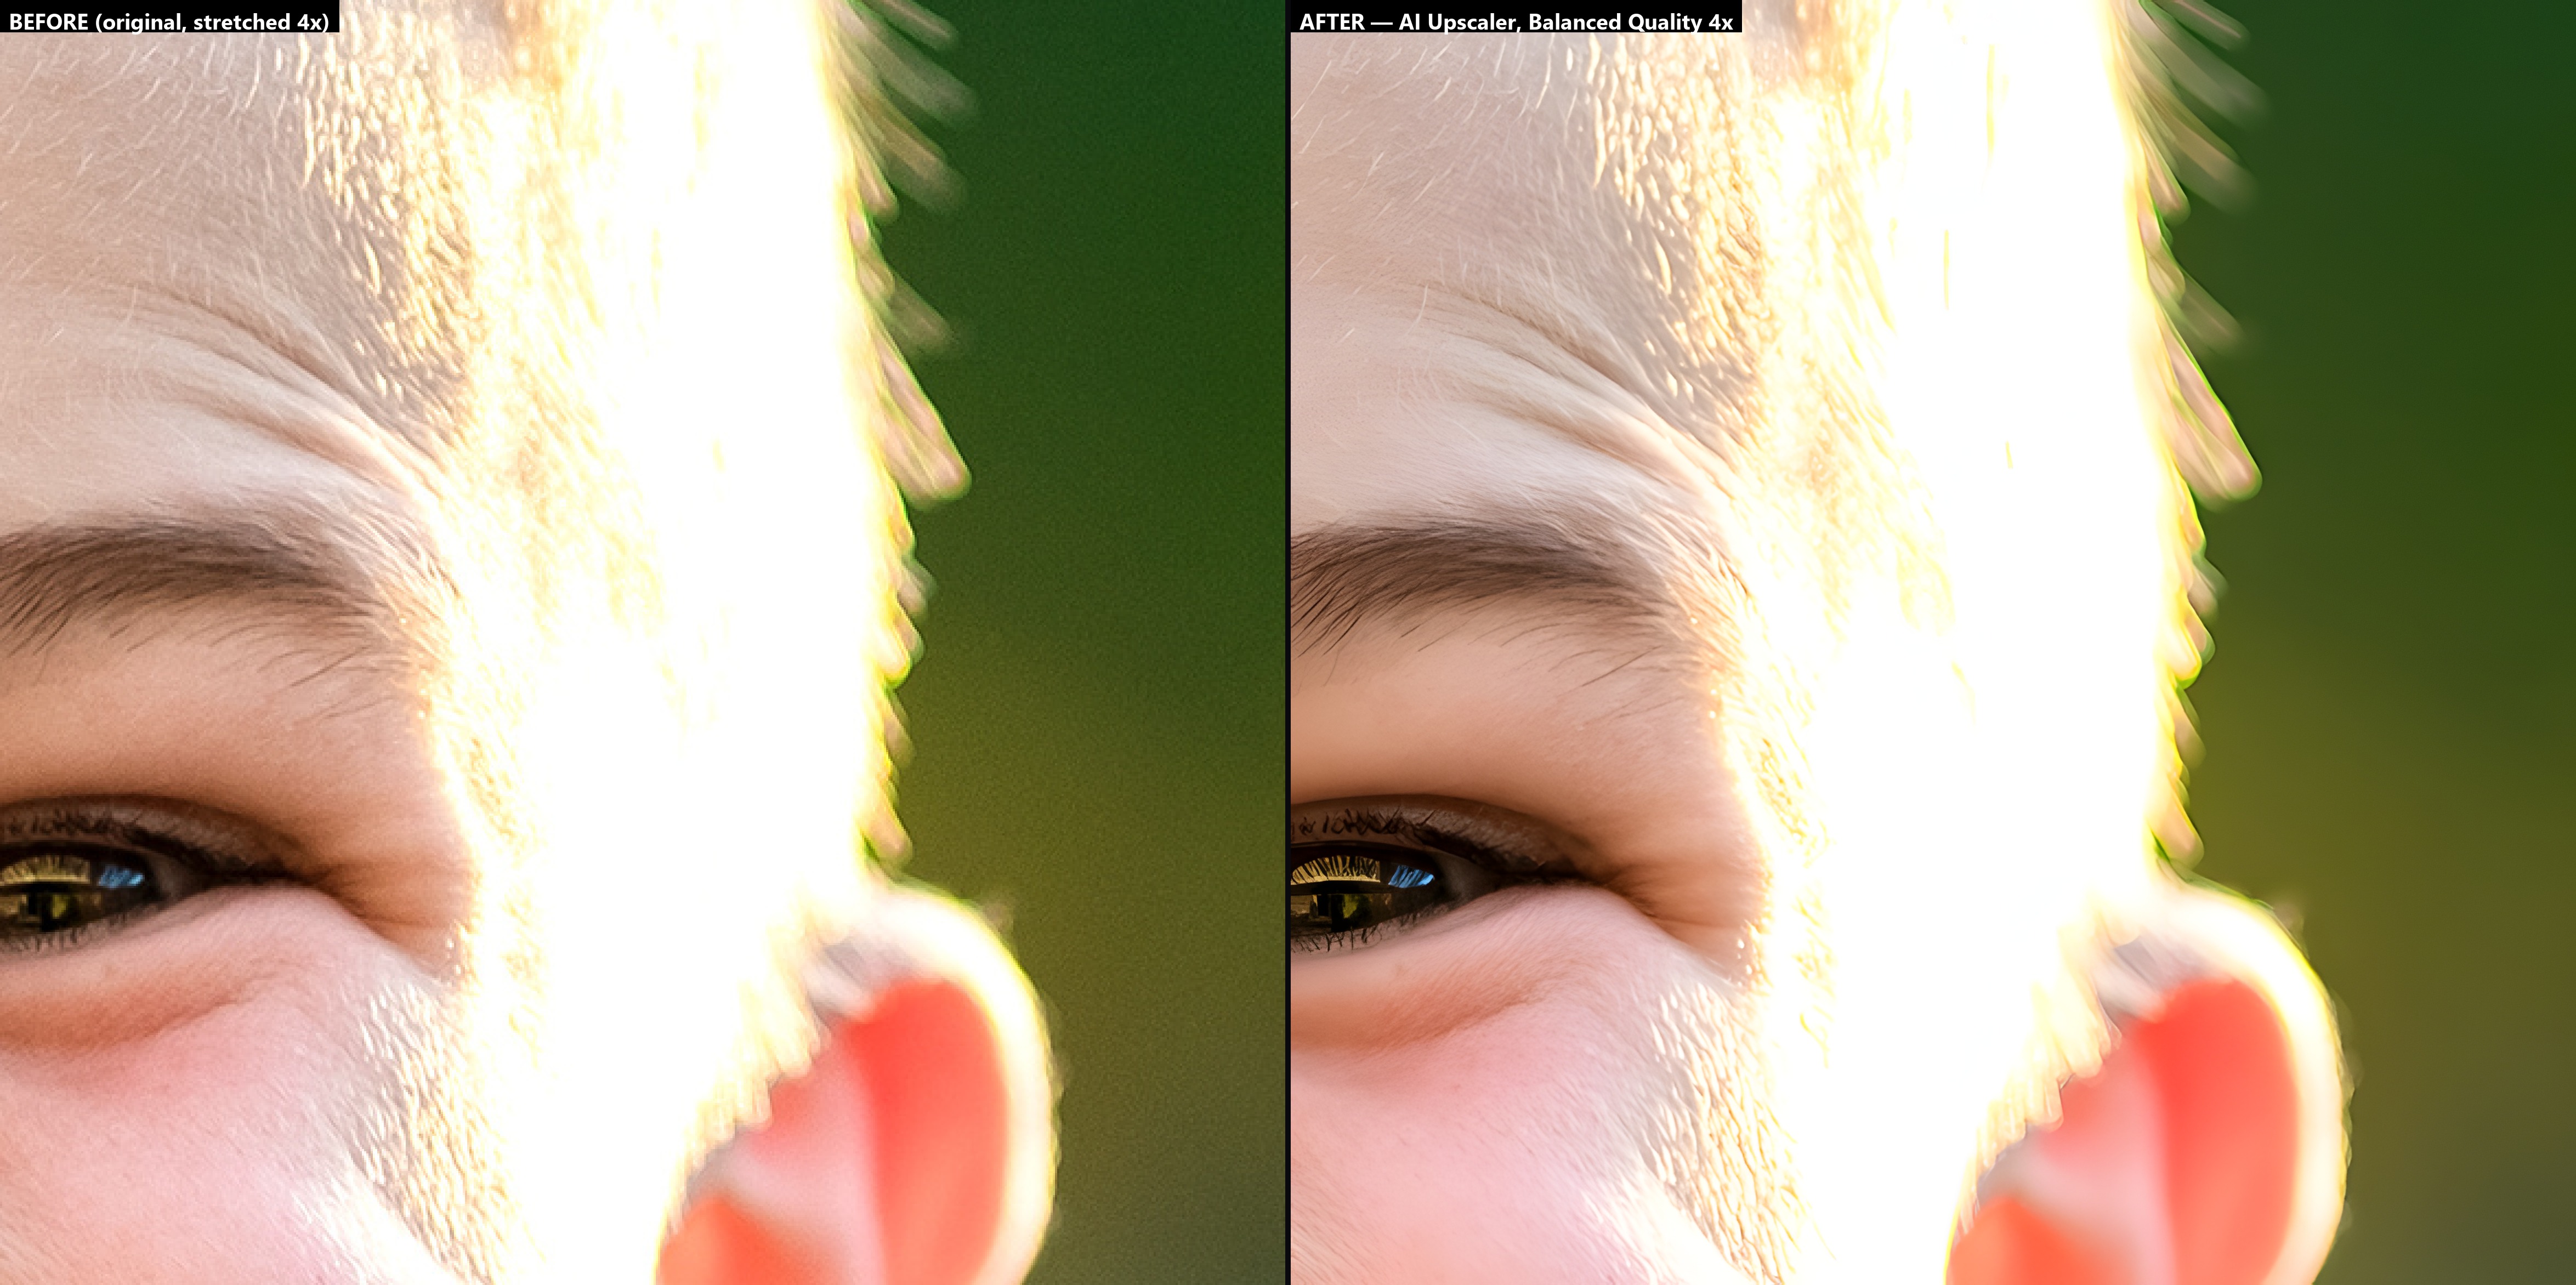
Left: the original, simply stretched 4x. Right: the same crop run through Balanced Quality 4x.Every control, explained 11 controls
Single / Multiple Images
Source mode for picking exact files. The Source card sizes itself to fit the image queue + preview.
Folder
Source mode for an entire folder (with Include subfolders). The Source card shrinks to just its input fields since there's no queue to show.
Image Queue
Drag & drop images here, or use Add below it. Click any thumbnail to preview that image on the right. Remove / Clear manage the queue without touching files on disk.
Settings (gear icon)
Opens the quality-preset popup — Quality preset (Sharp Detail vs Balanced Quality), Scale (2x/3x/4x), output Format, and advanced Tile / GPU fields (leave these two on their defaults unless troubleshooting a specific graphics card).
Results (grid icon)
Appears once at least one image has finished — opens a table of every processed file with before/after size.
Preview panel — Compare / Side by Side
Compare gives a draggable divider over the same spot in both images. Side by Side shows the full before and after next to each other. Click any completed thumbnail in the queue to load it here.
Zoom controls (−, Fit, +, 100%)
Fit shows the whole image; 100% shows true pixel size; the +/− buttons step zoom in between. Scroll to zoom, drag to pan, double-click to toggle Fit/100%.
Output folder
Where upscaled files are written, with Browse to pick a folder and Open to jump straight to it in Explorer once a run finishes.
Start Upscaling / Stop
Start begins the batch; Stop cancels after the image currently processing finishes — nothing is left half-written.
Status bar / progress bar
Shows which file is processing now and overall percent complete across the whole batch.
Done / Skipped / Failed counters
Running tally for the current batch — Skipped covers files that already had an output present, Failed covers anything the engine couldn't process.
Tool 05
Image Enhancer
Color-grade and clean up images at their existing size — never resizes, so it's safe to
run on anything without changing dimensions. Has a live before/after preview, unlike the other tools.
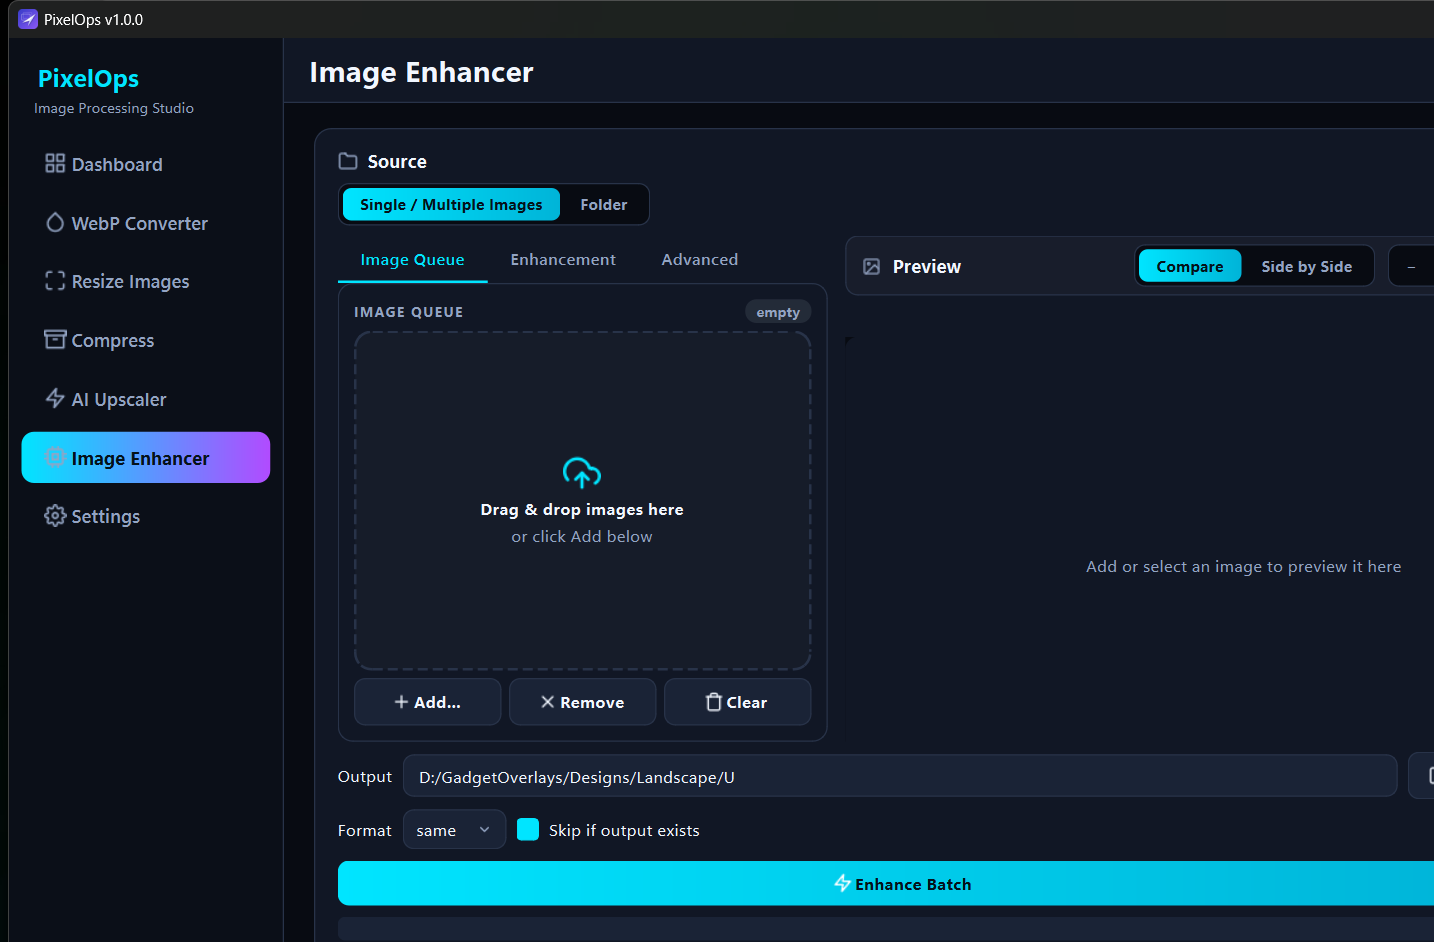
Image Queue tab — Folder mode, showing the compact layout fix in action.
Add images on the Image Queue tab — Single/Multiple or Folder, same as
every other tool.
Pick a Color Profile on the Enhancement tab — 13 built-in presets (see
below), or leave it on None to use only the manual sliders.
Adjust Sharpness / Saturation / Contrast / Brightness / Denoise — these five
always apply, on top of whatever profile you picked, including None.
Fine-tune on the Advanced tab — Warmth, Tint, Vignette, Soften, and Grain
stack additively on top of the profile's own recipe.
Click Enhance Batch once the live preview looks right.
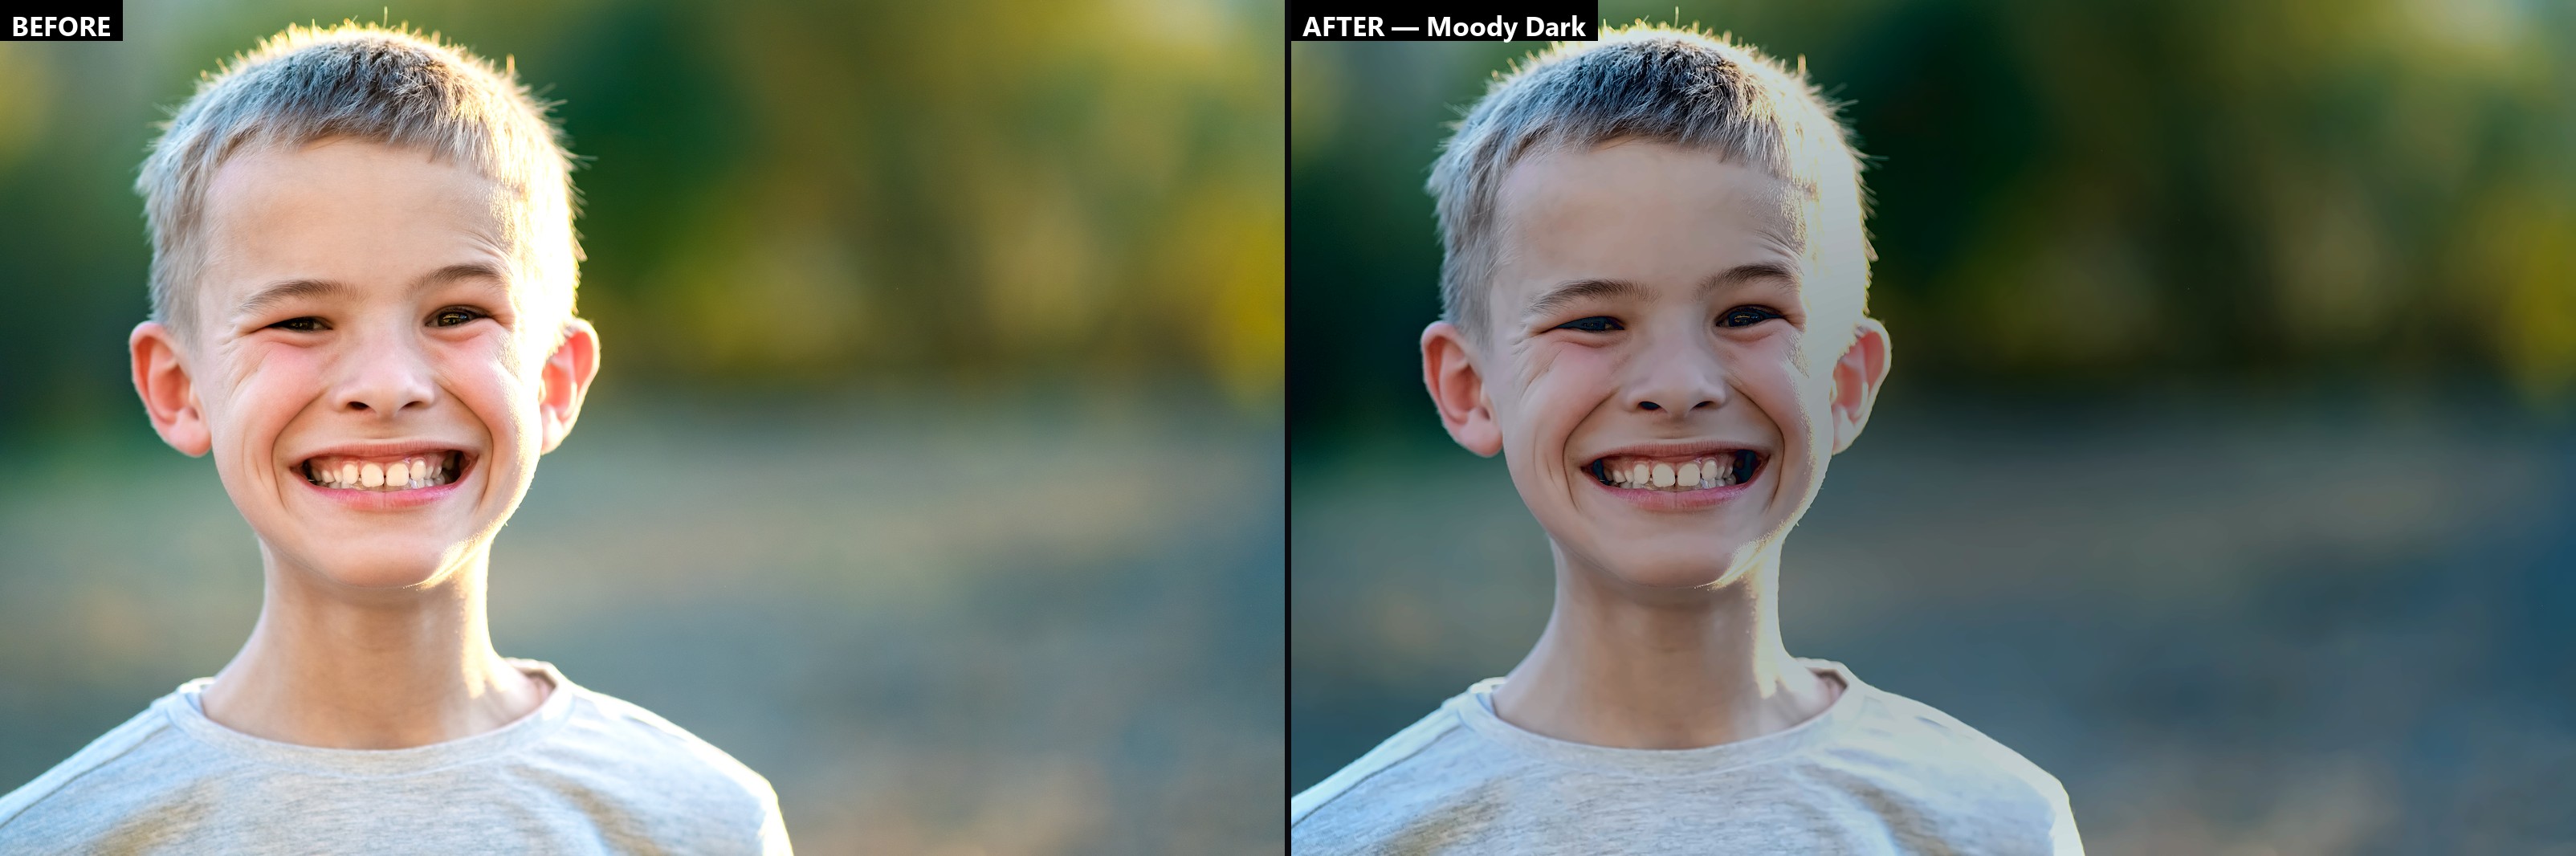
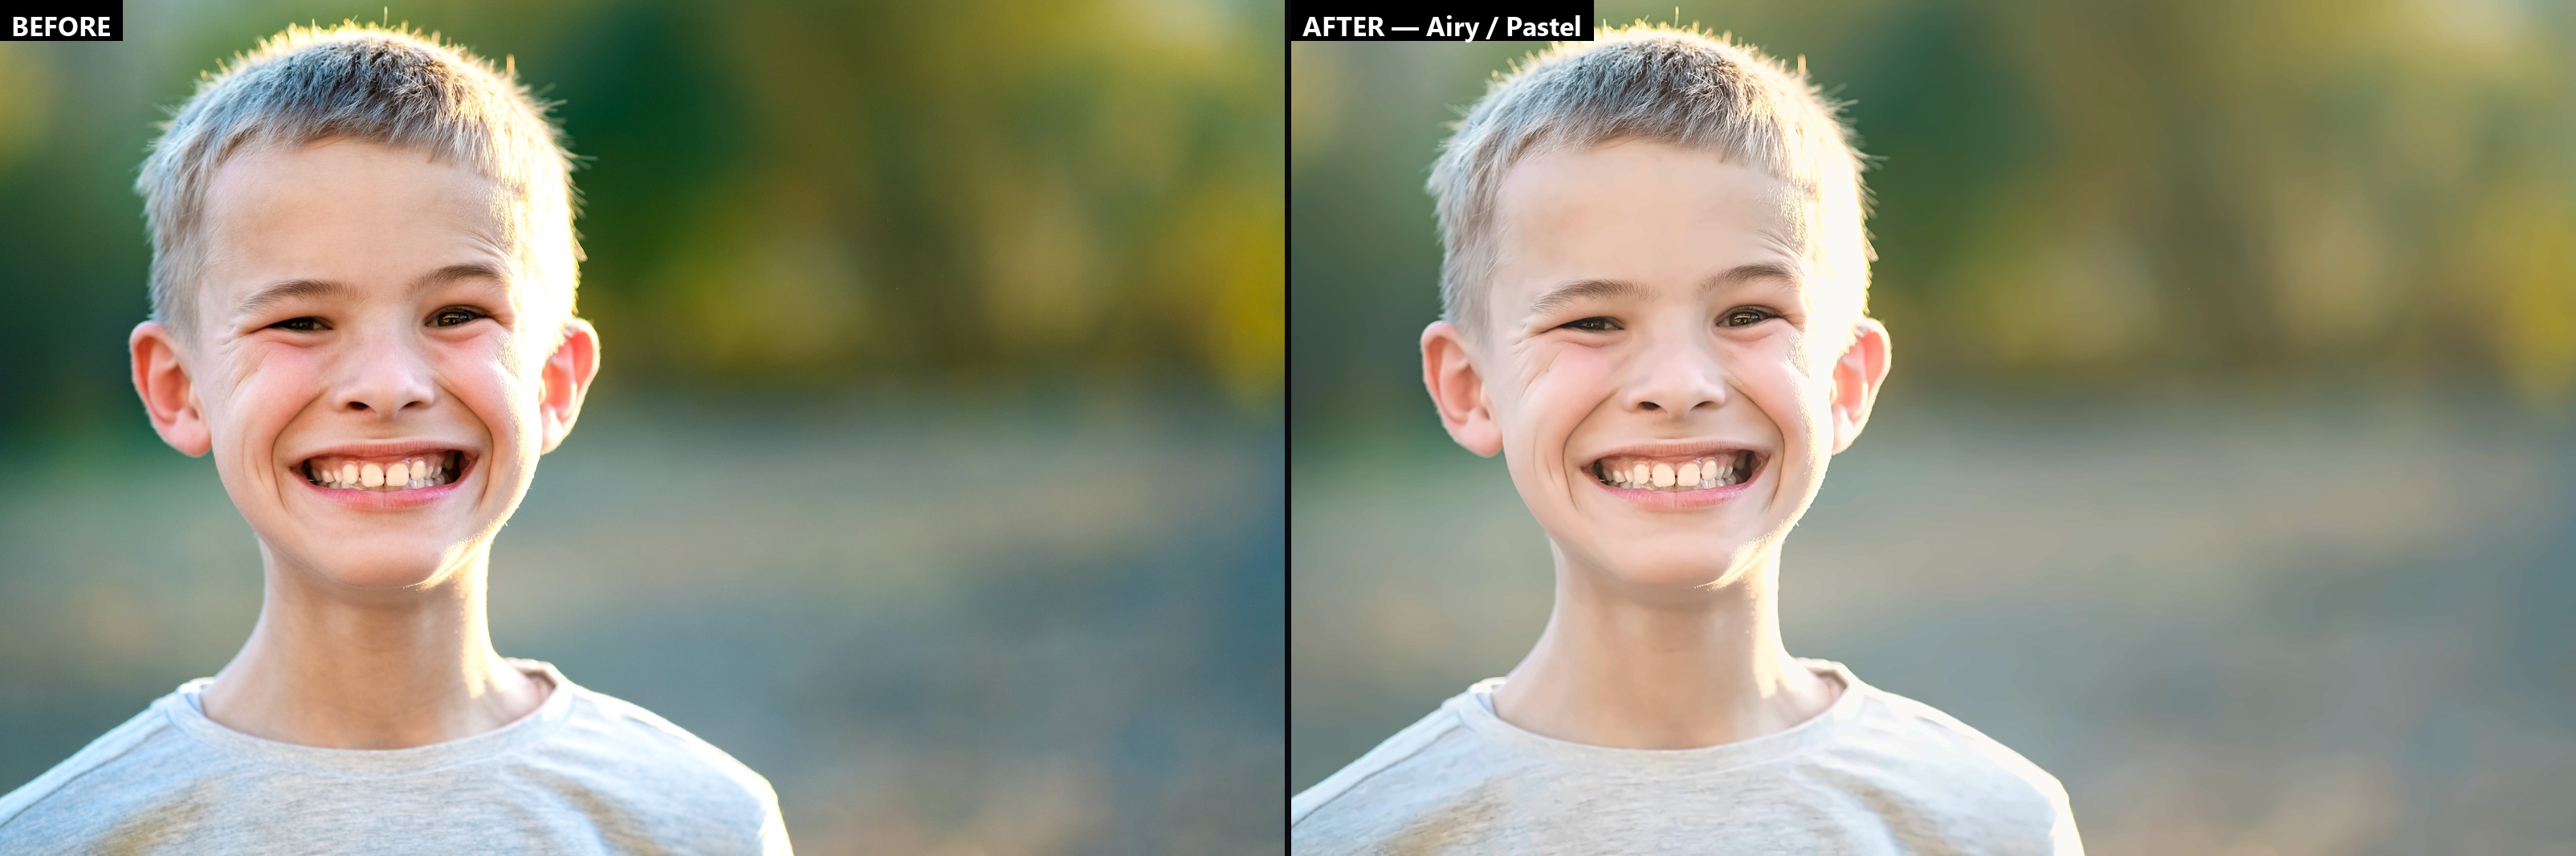
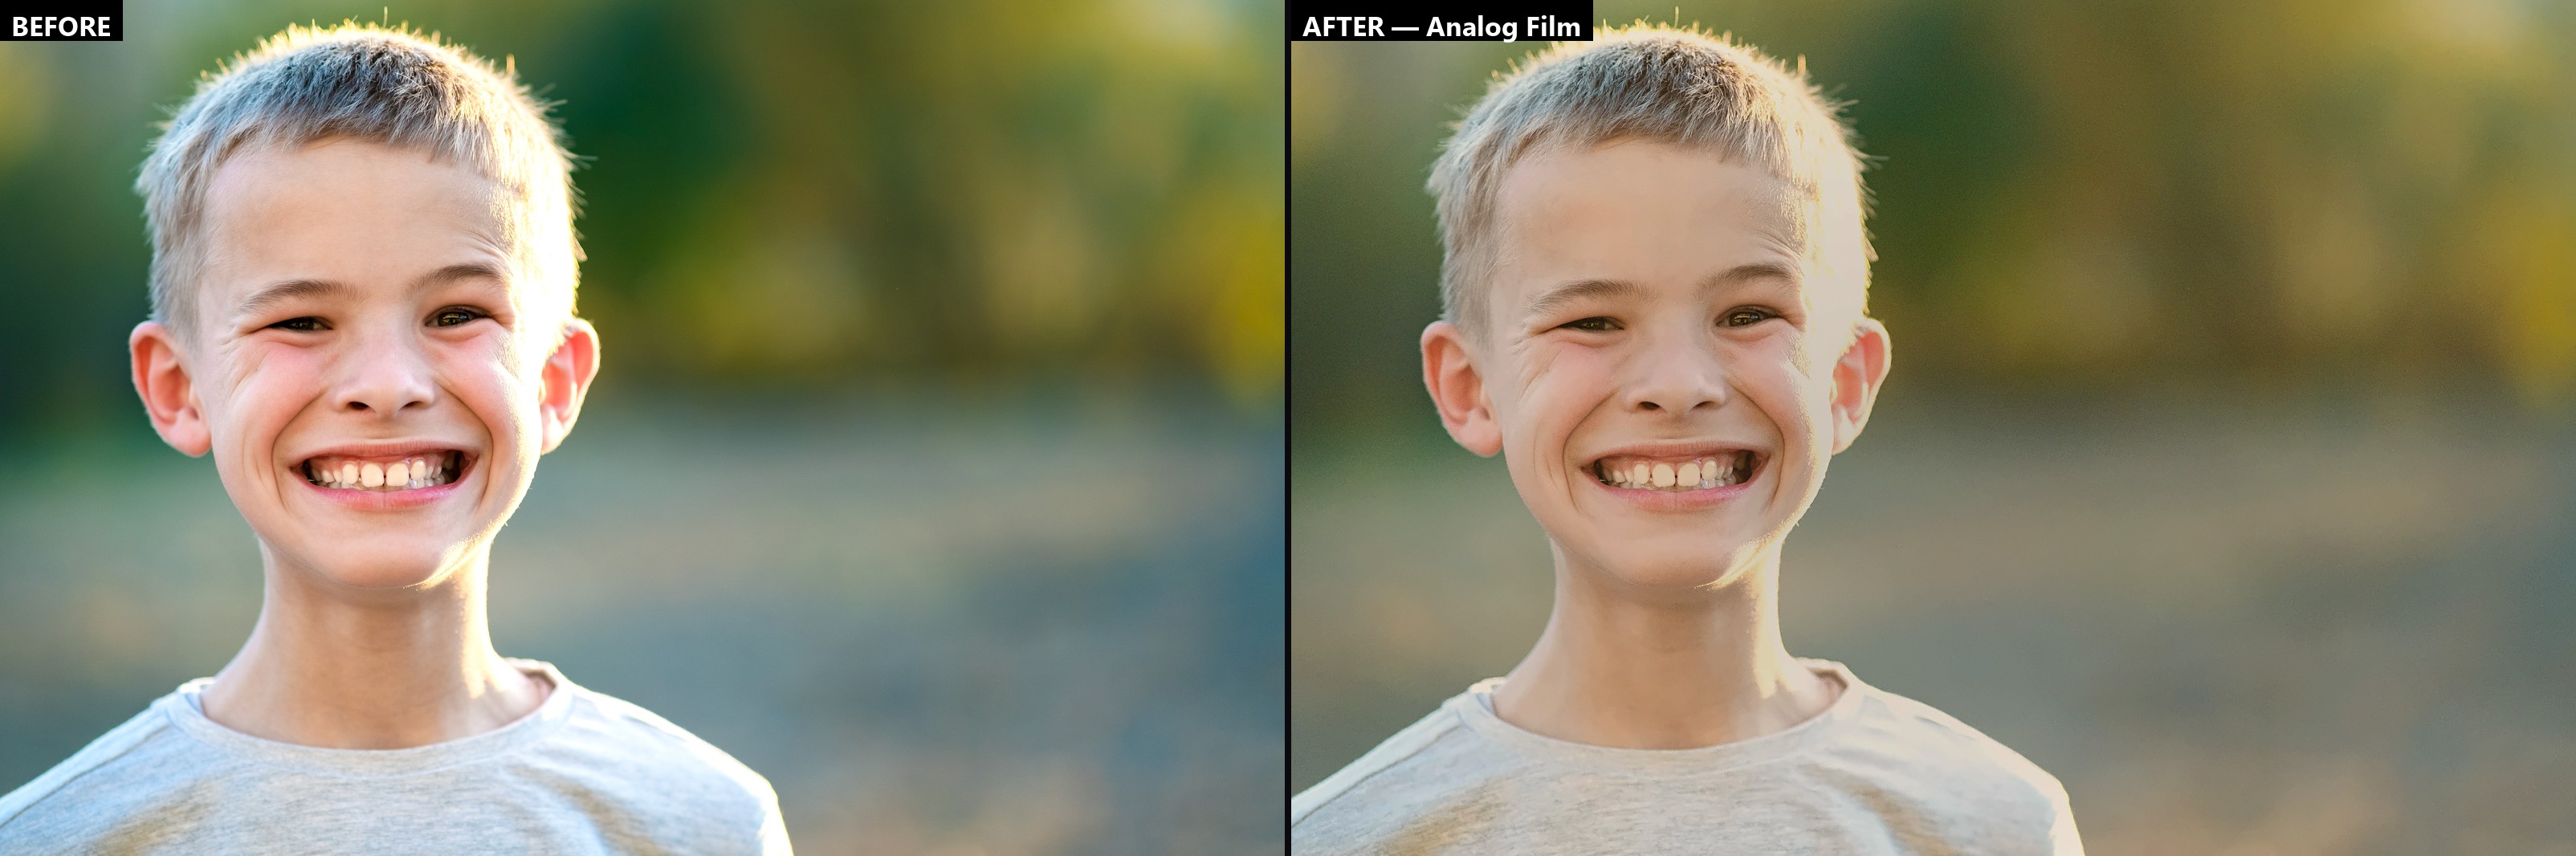
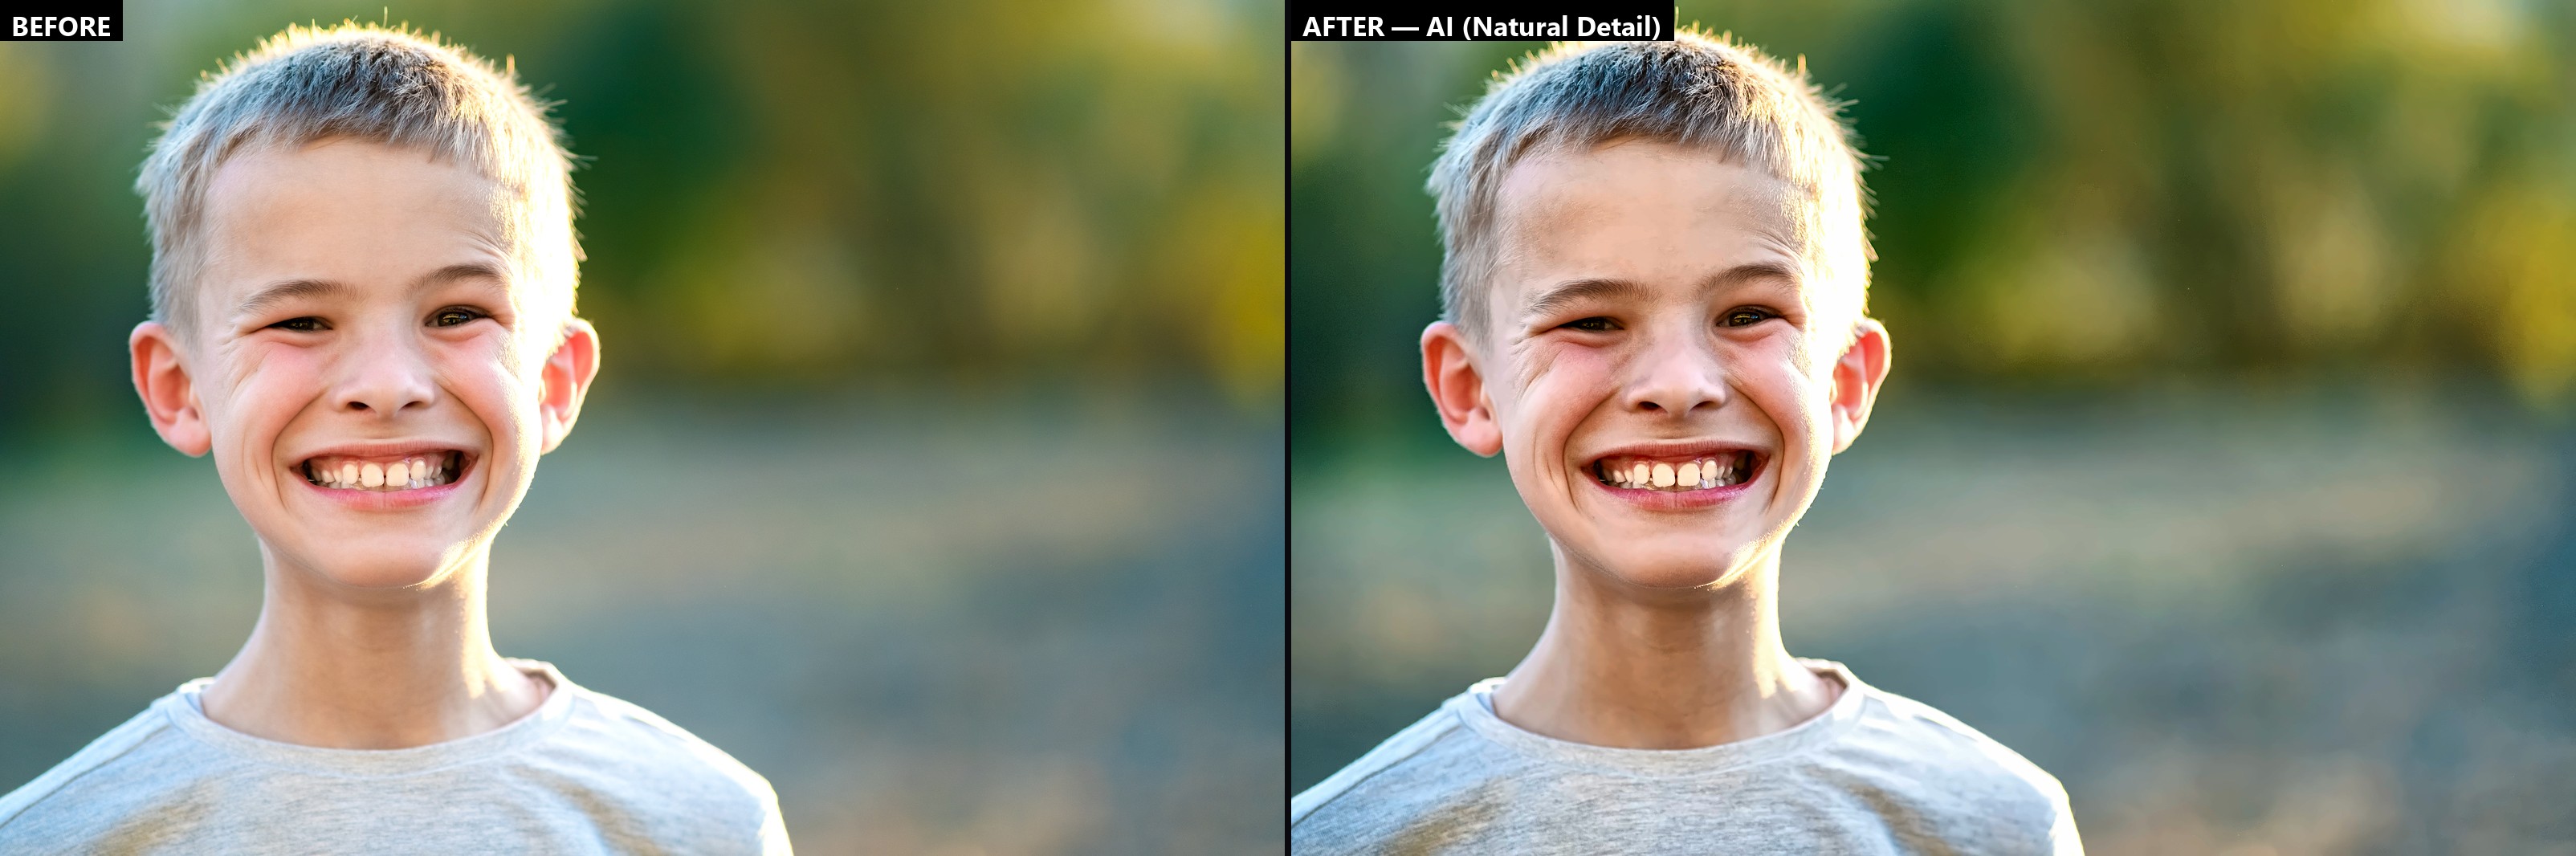
The 13 color profiles
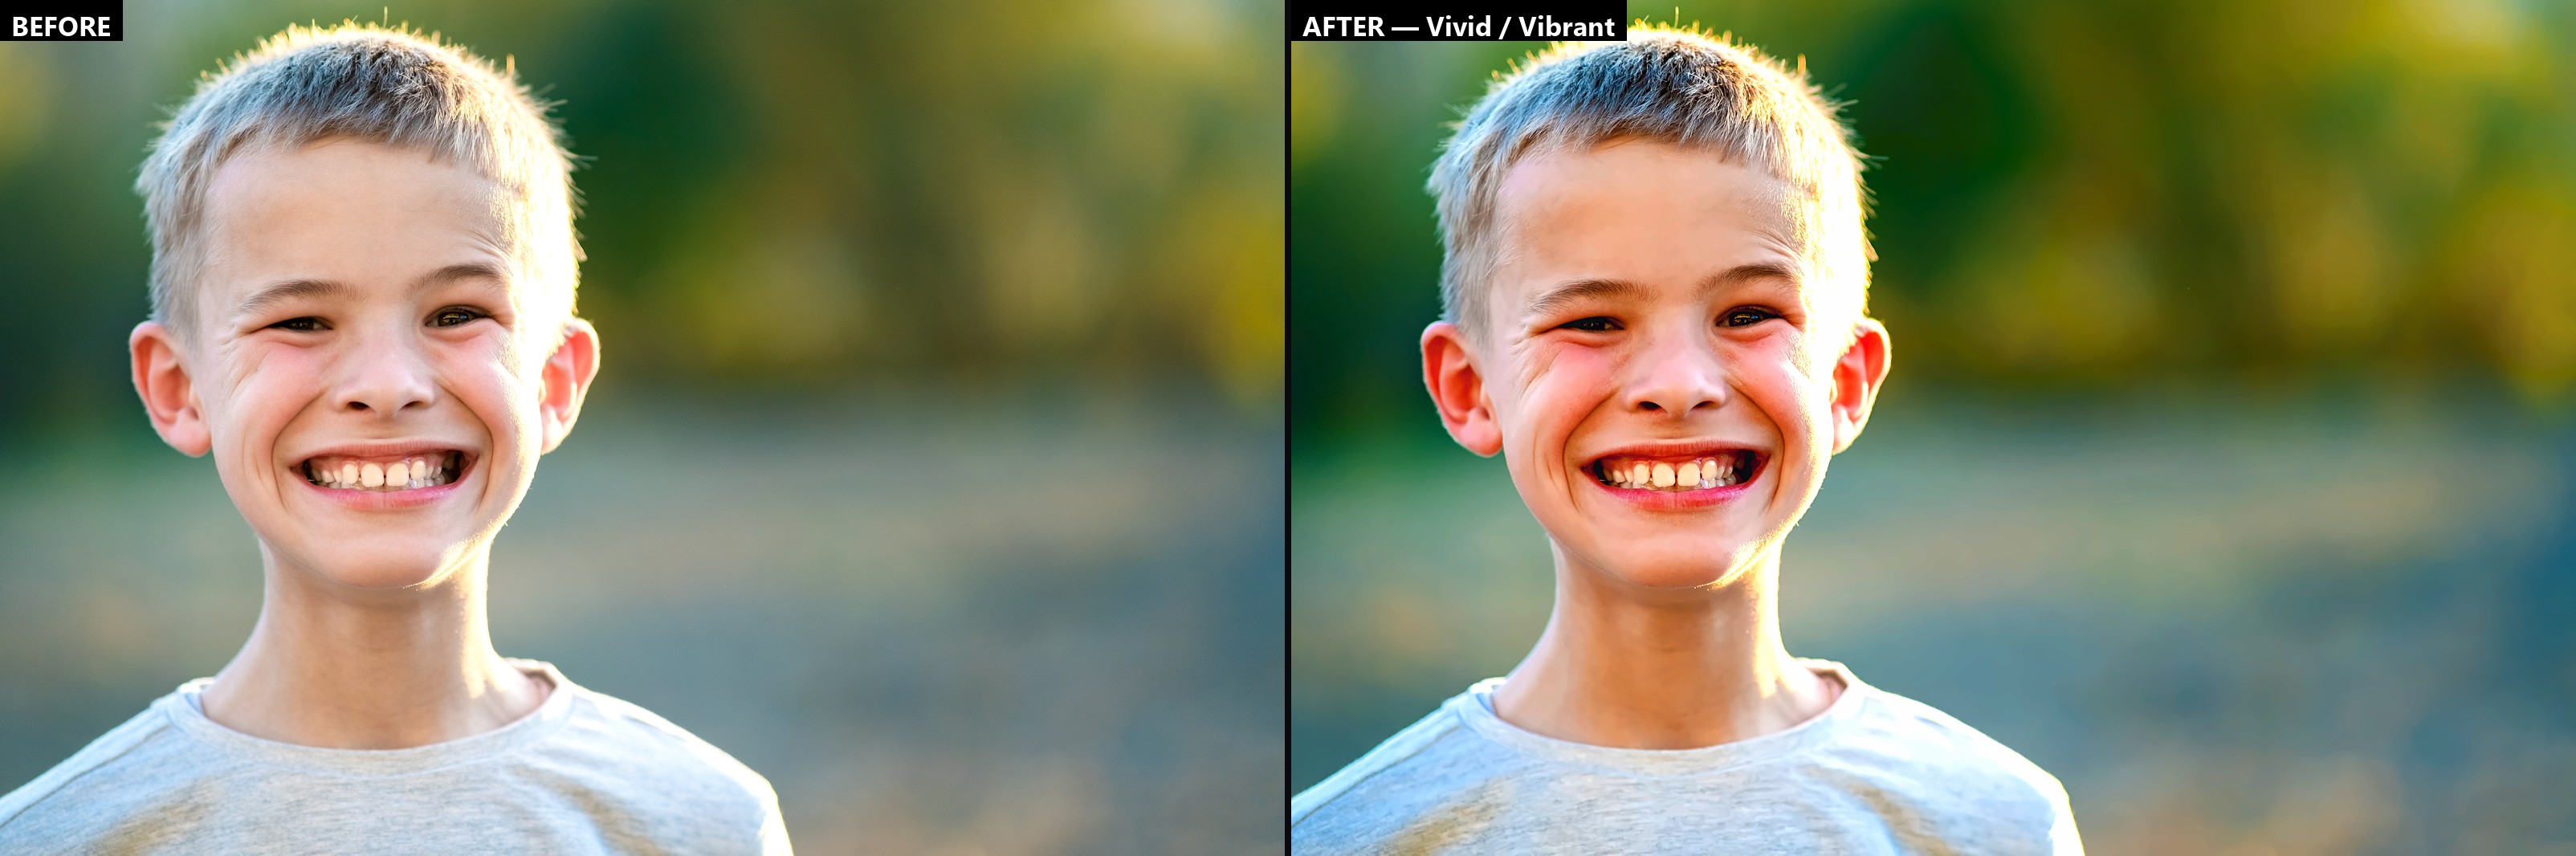
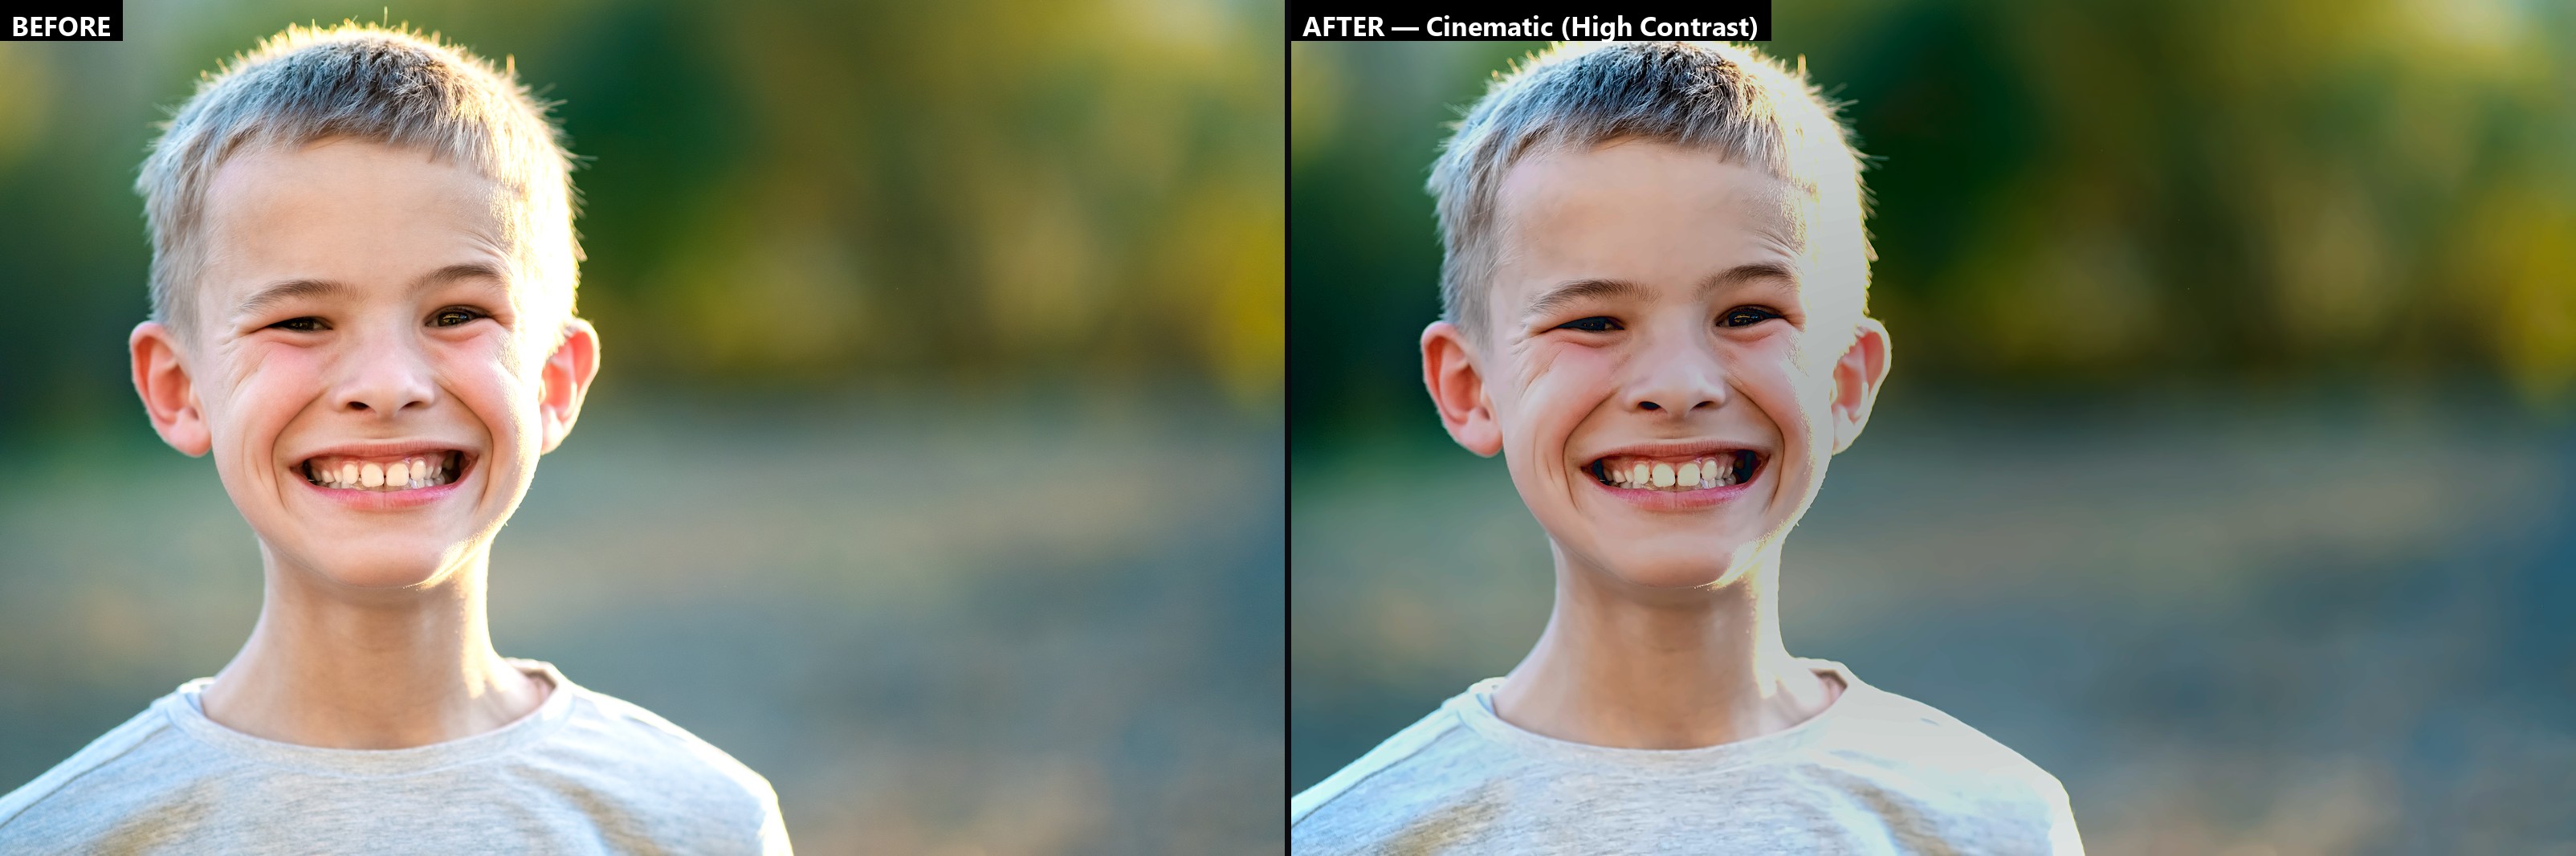
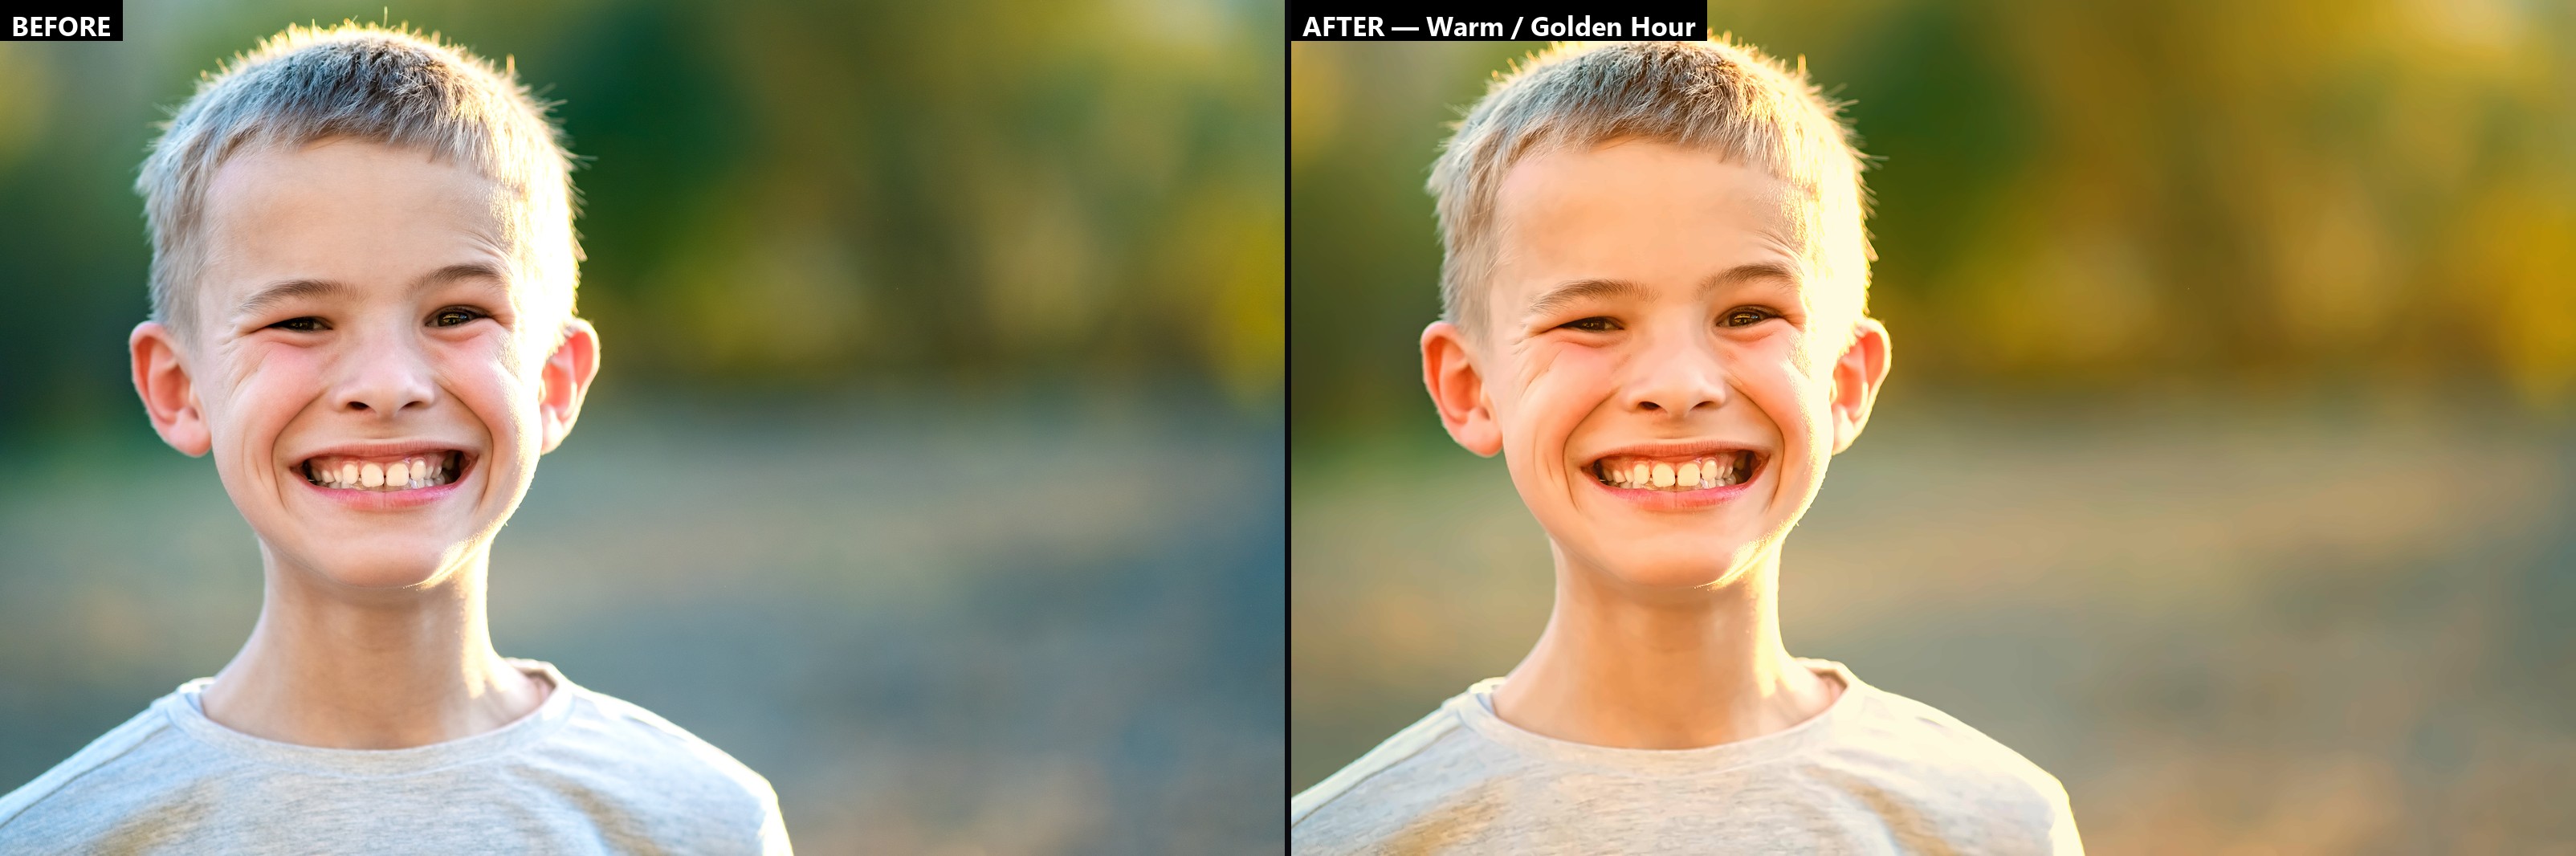
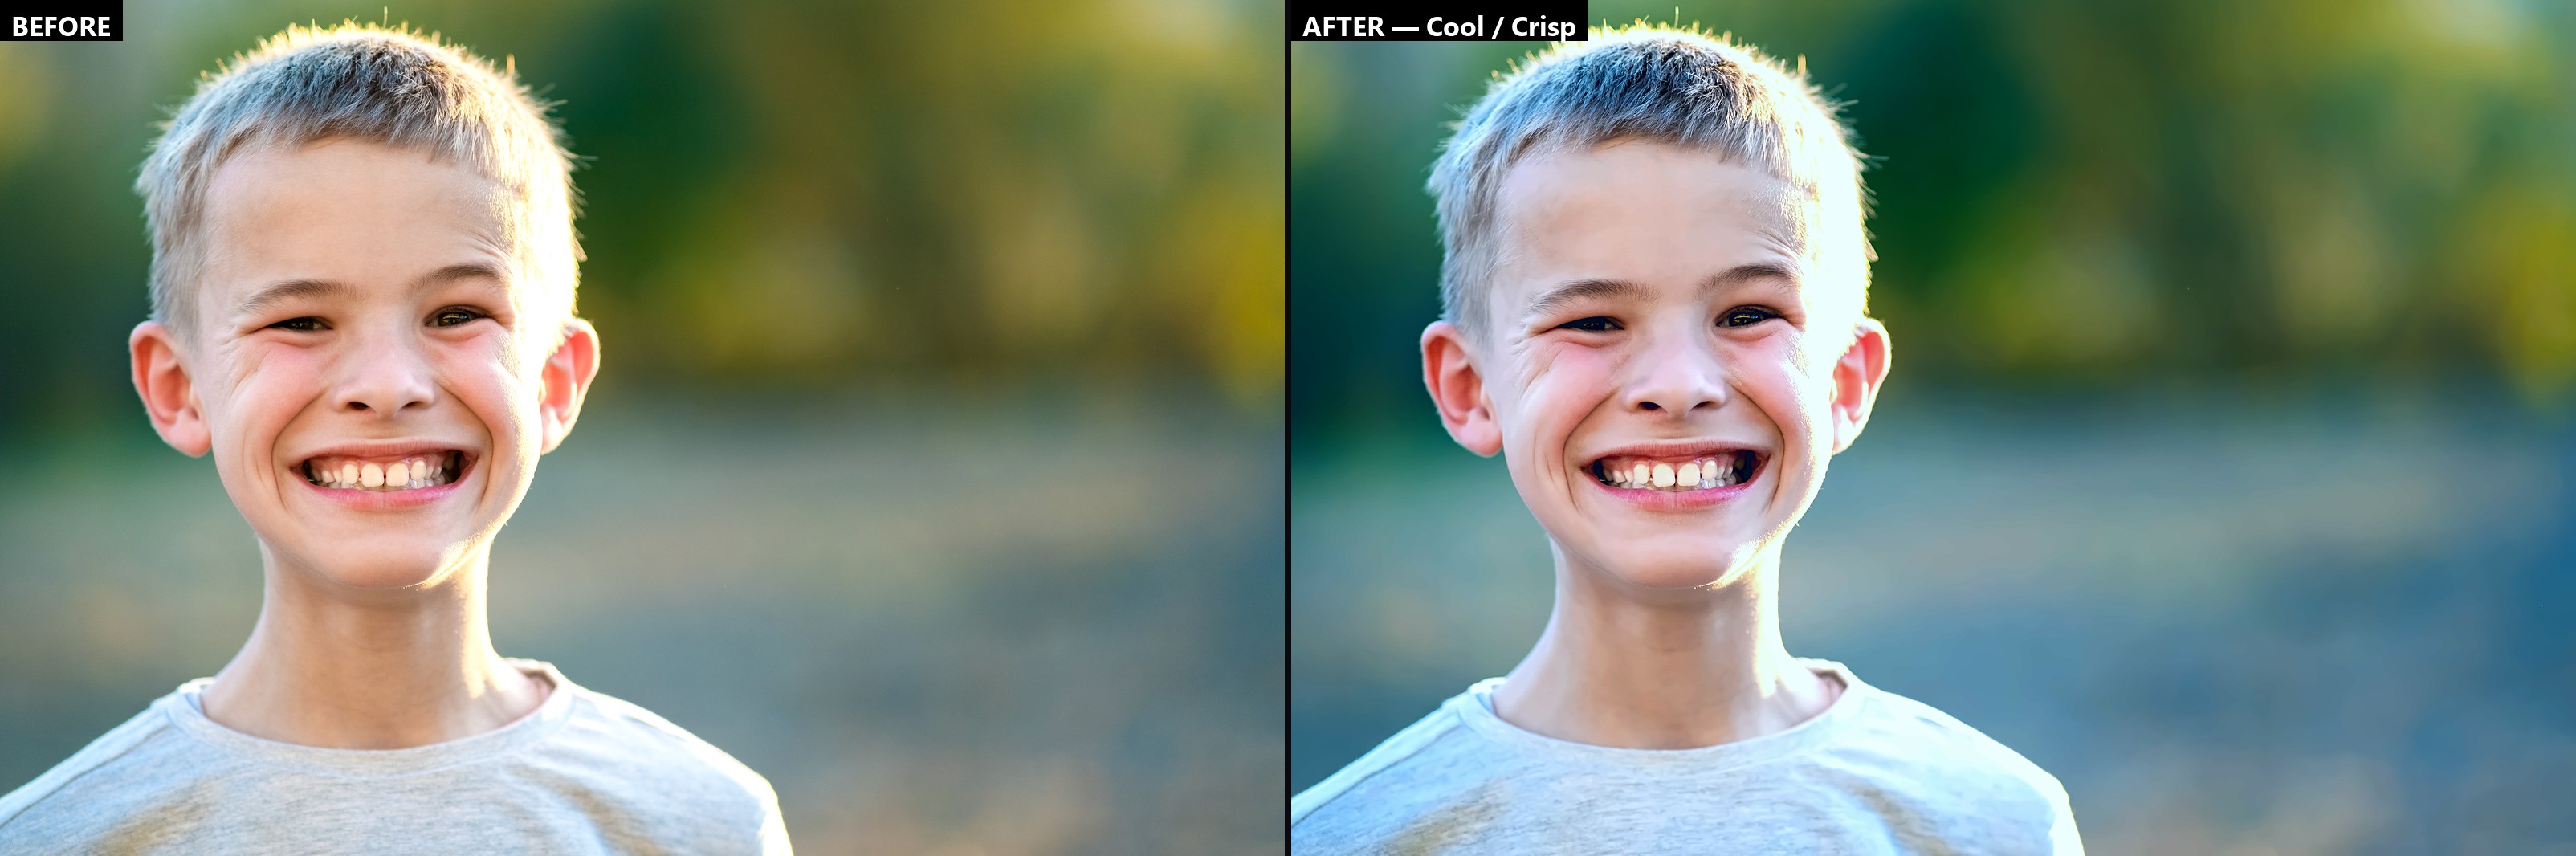
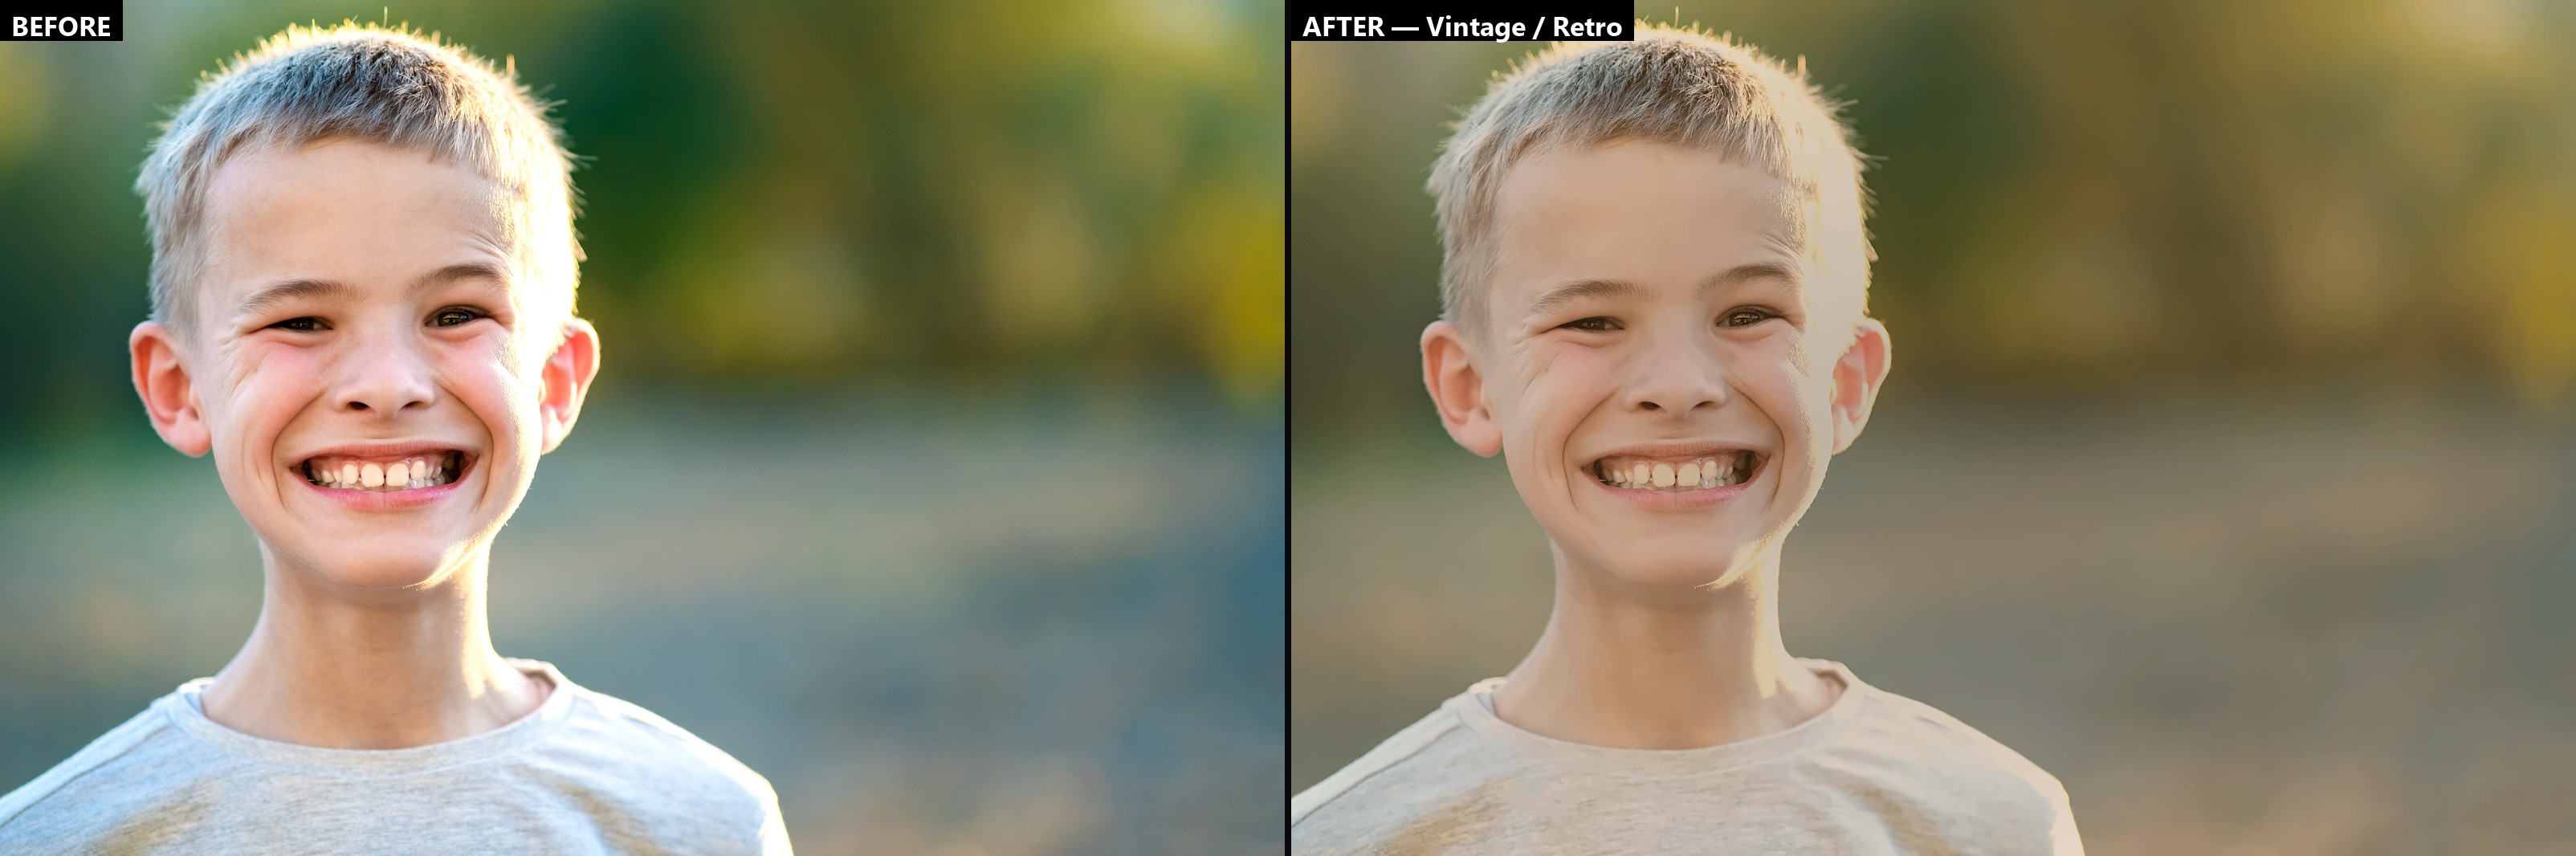
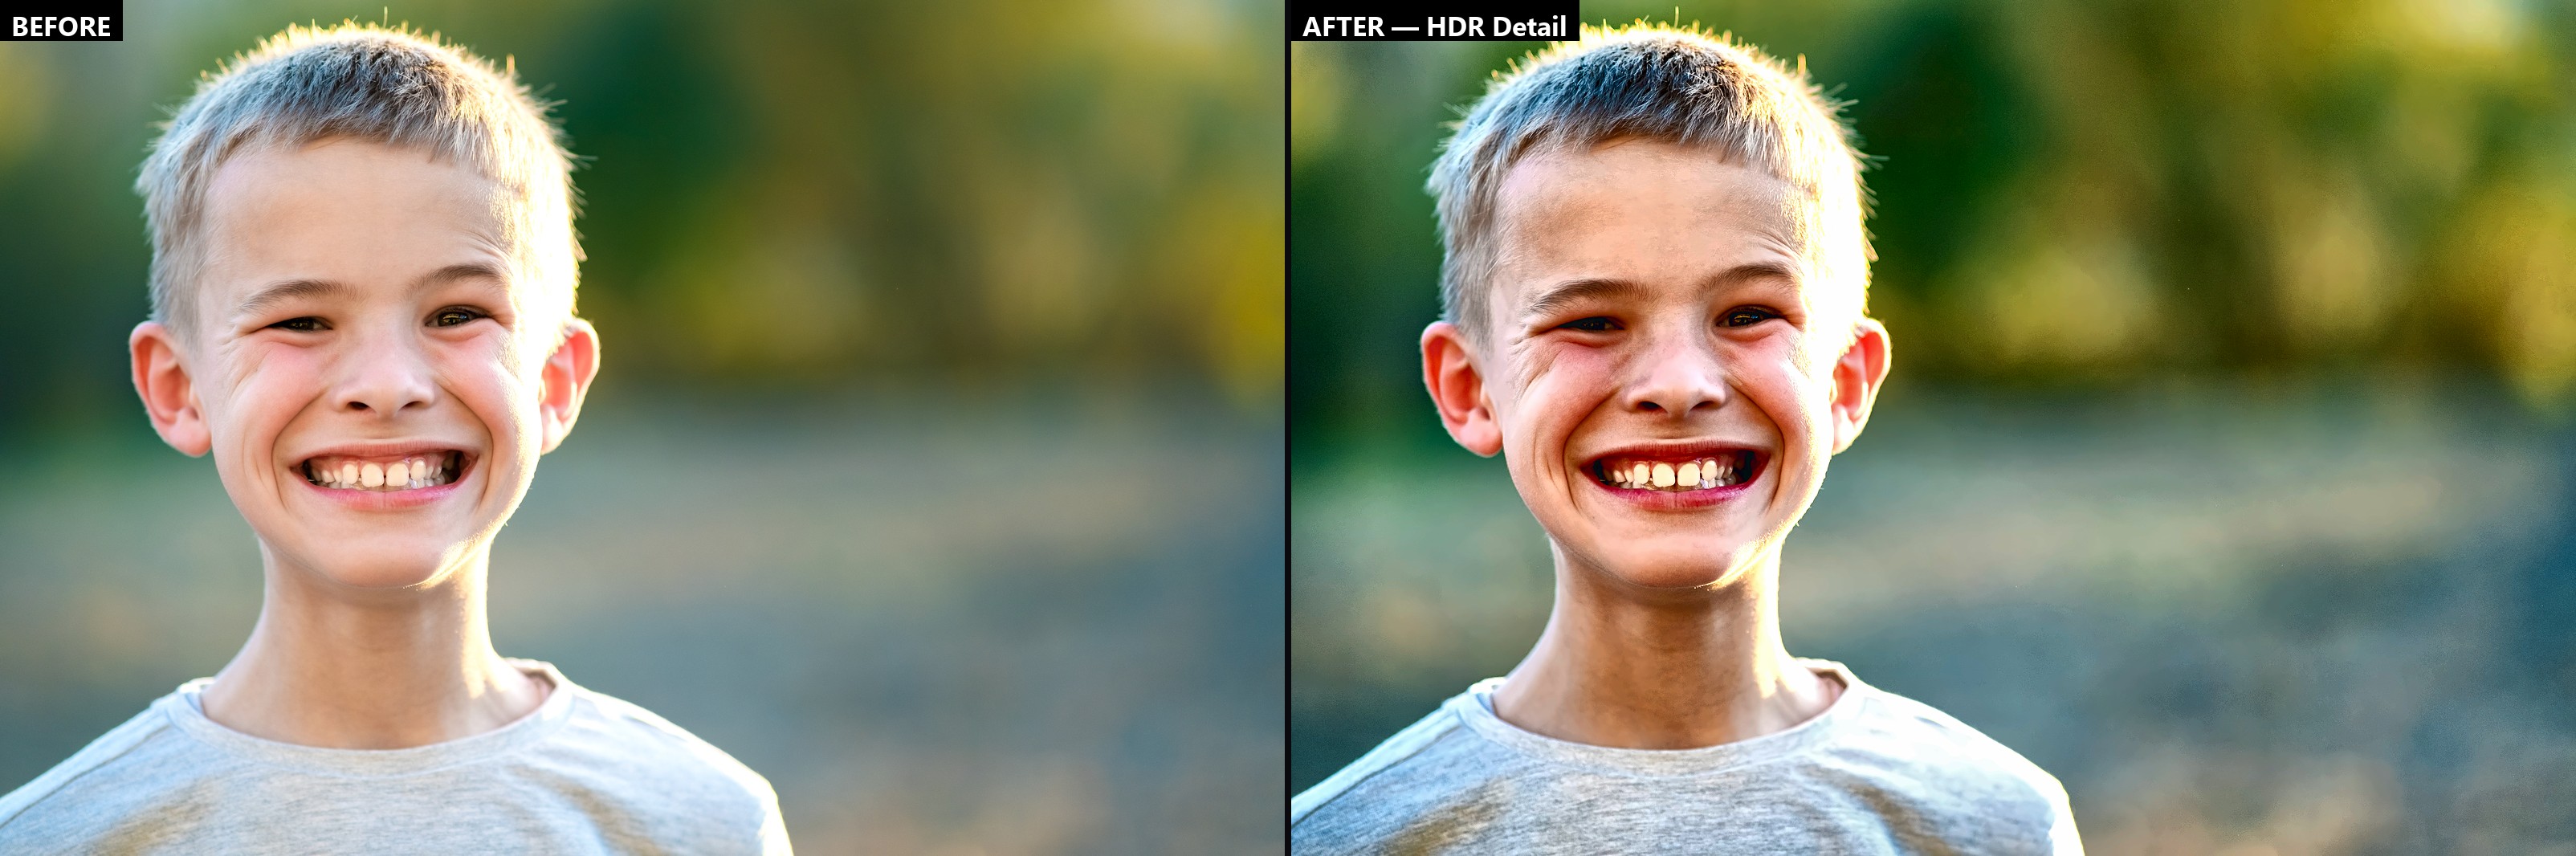
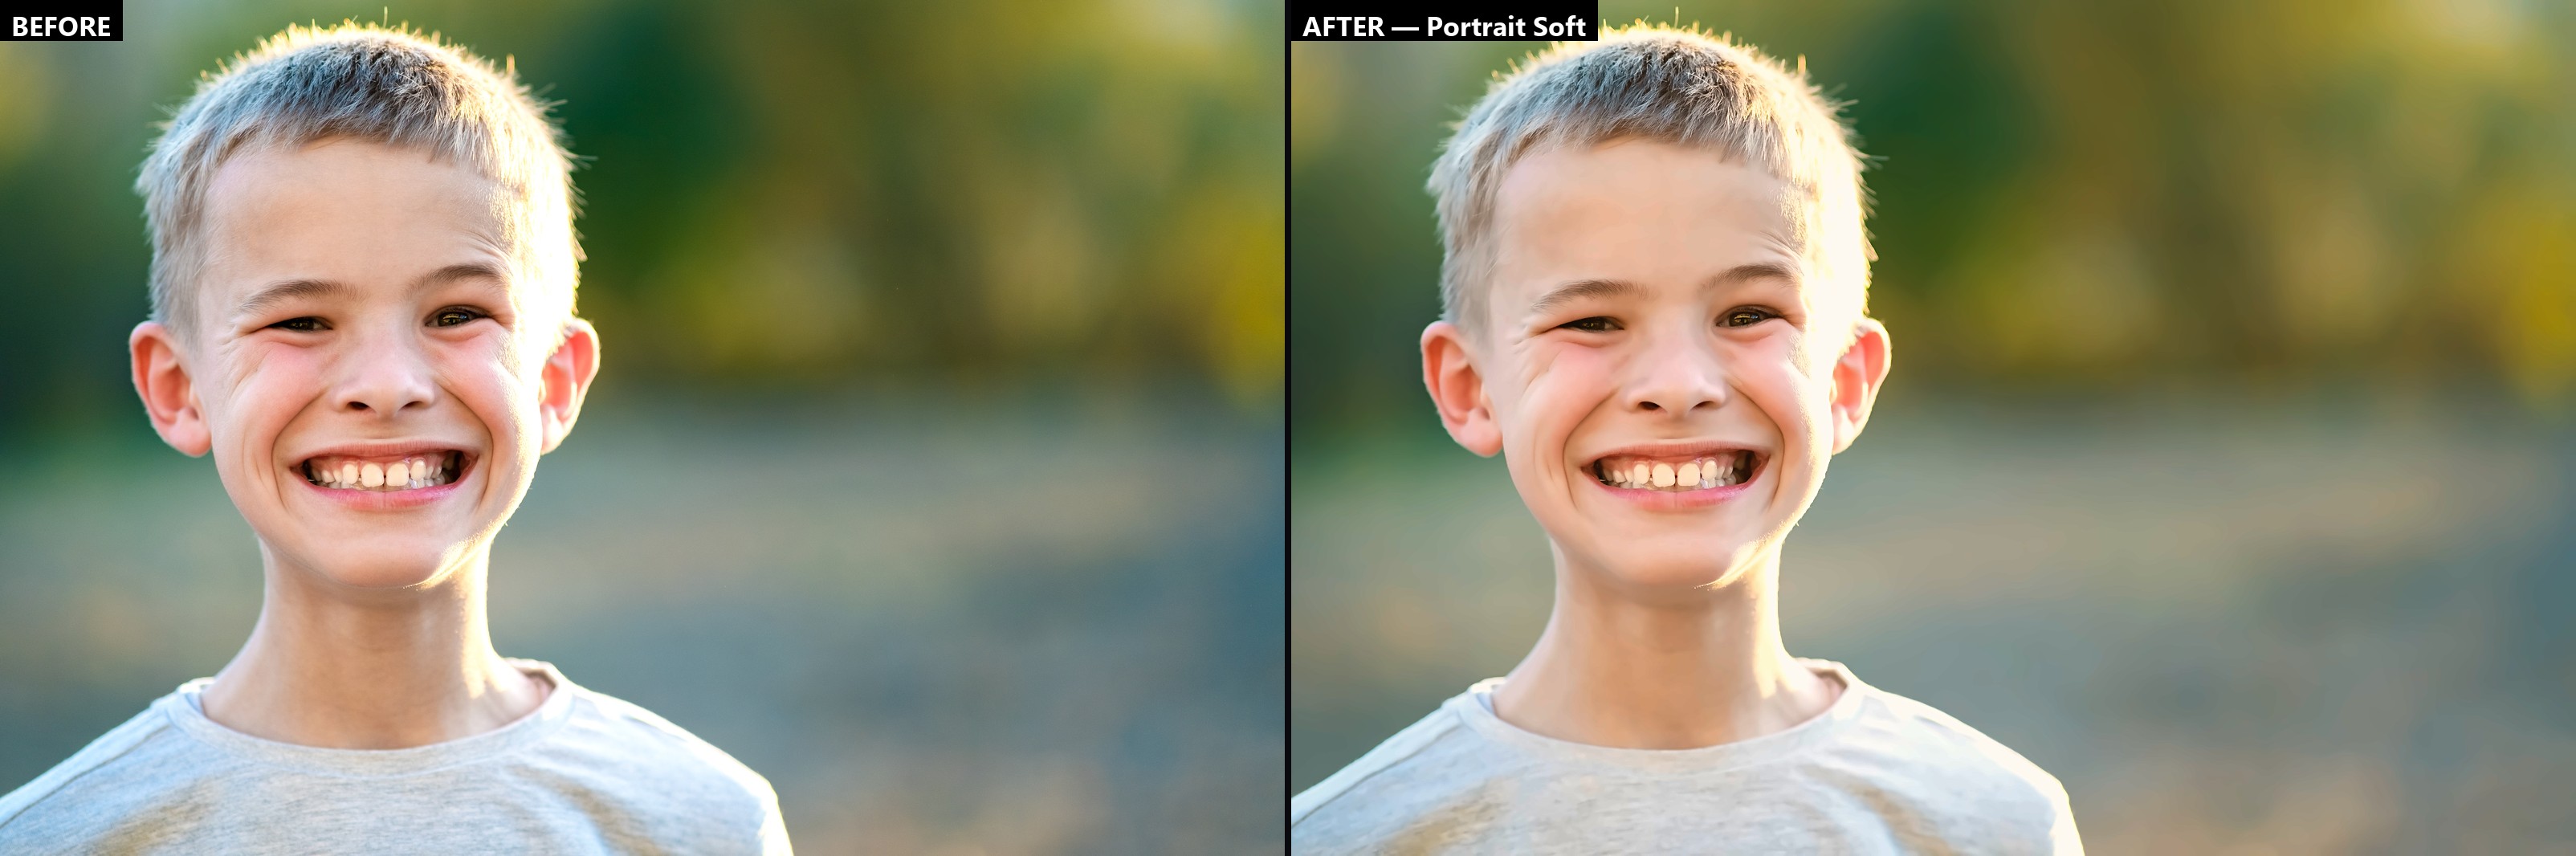
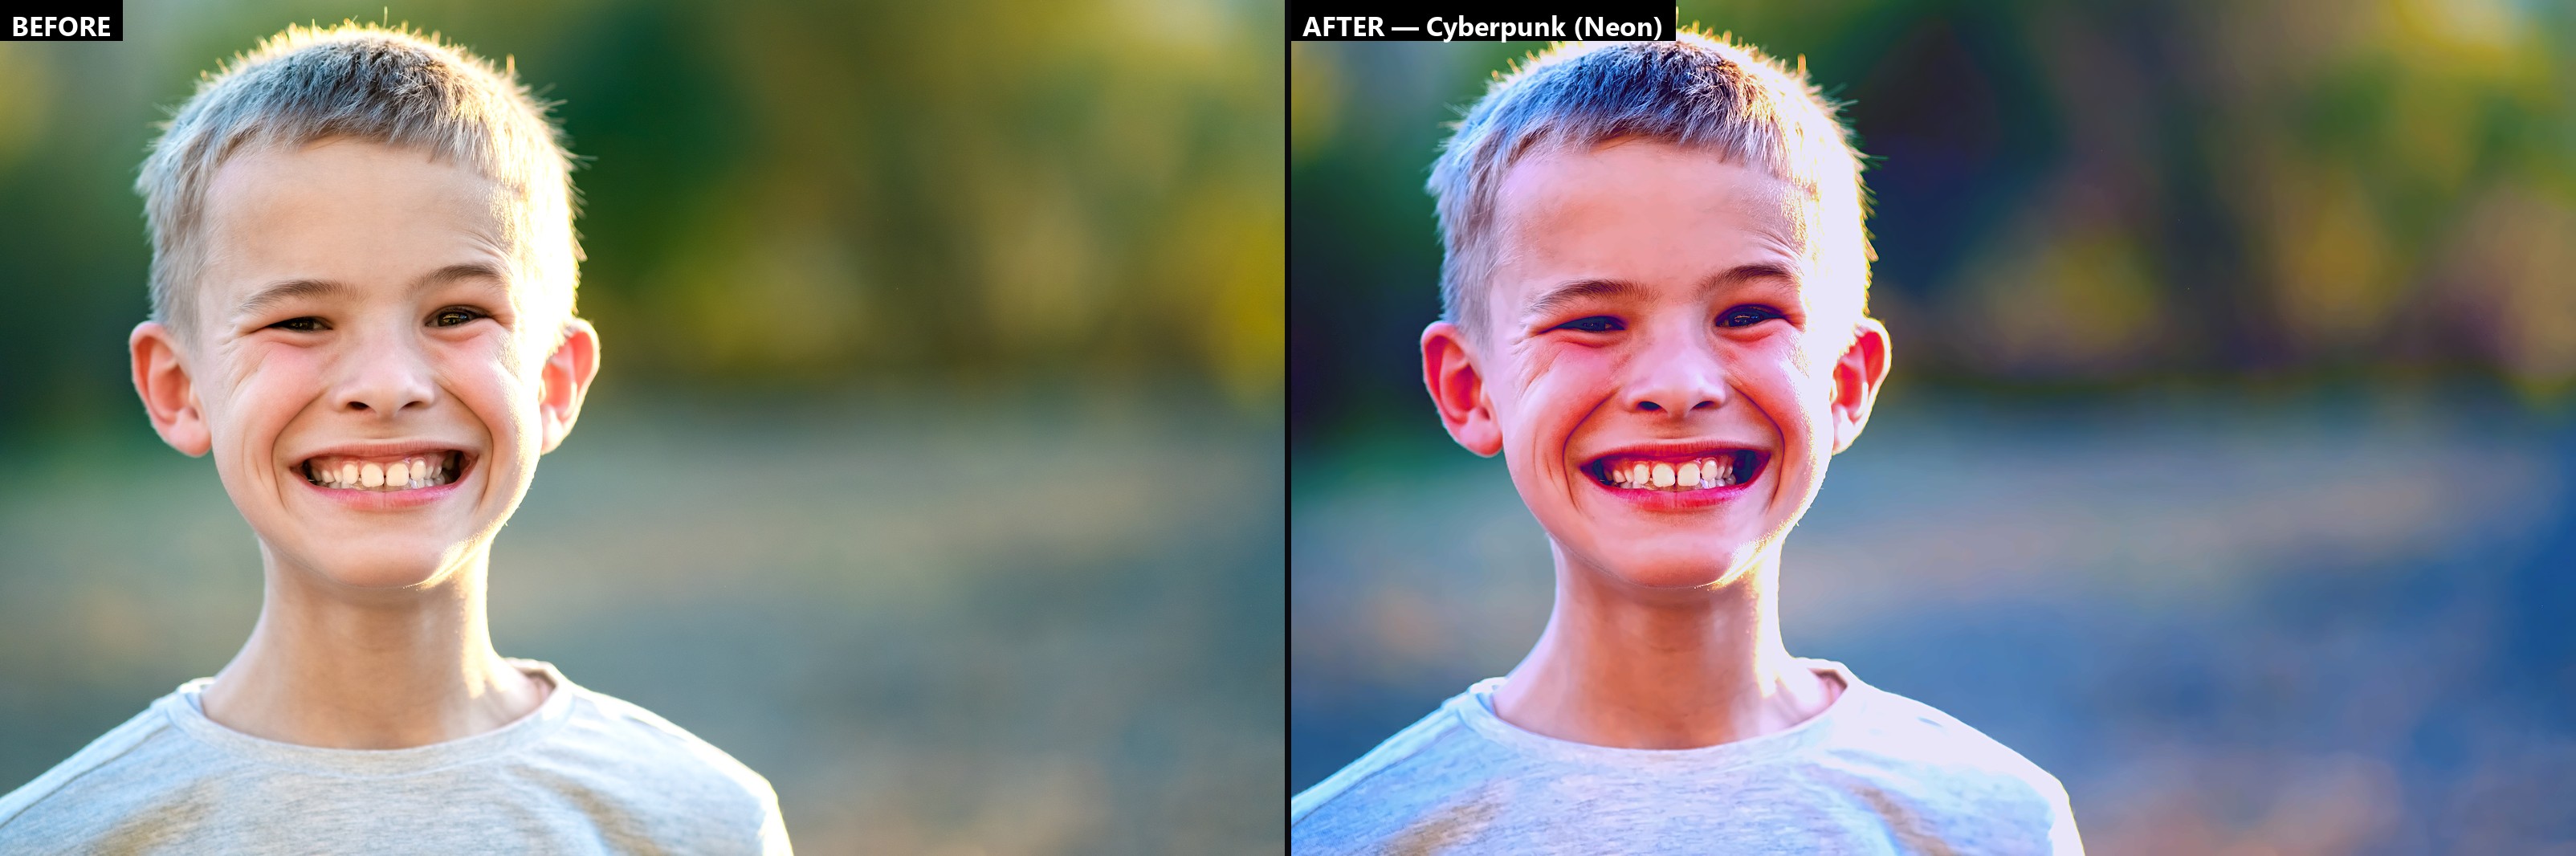
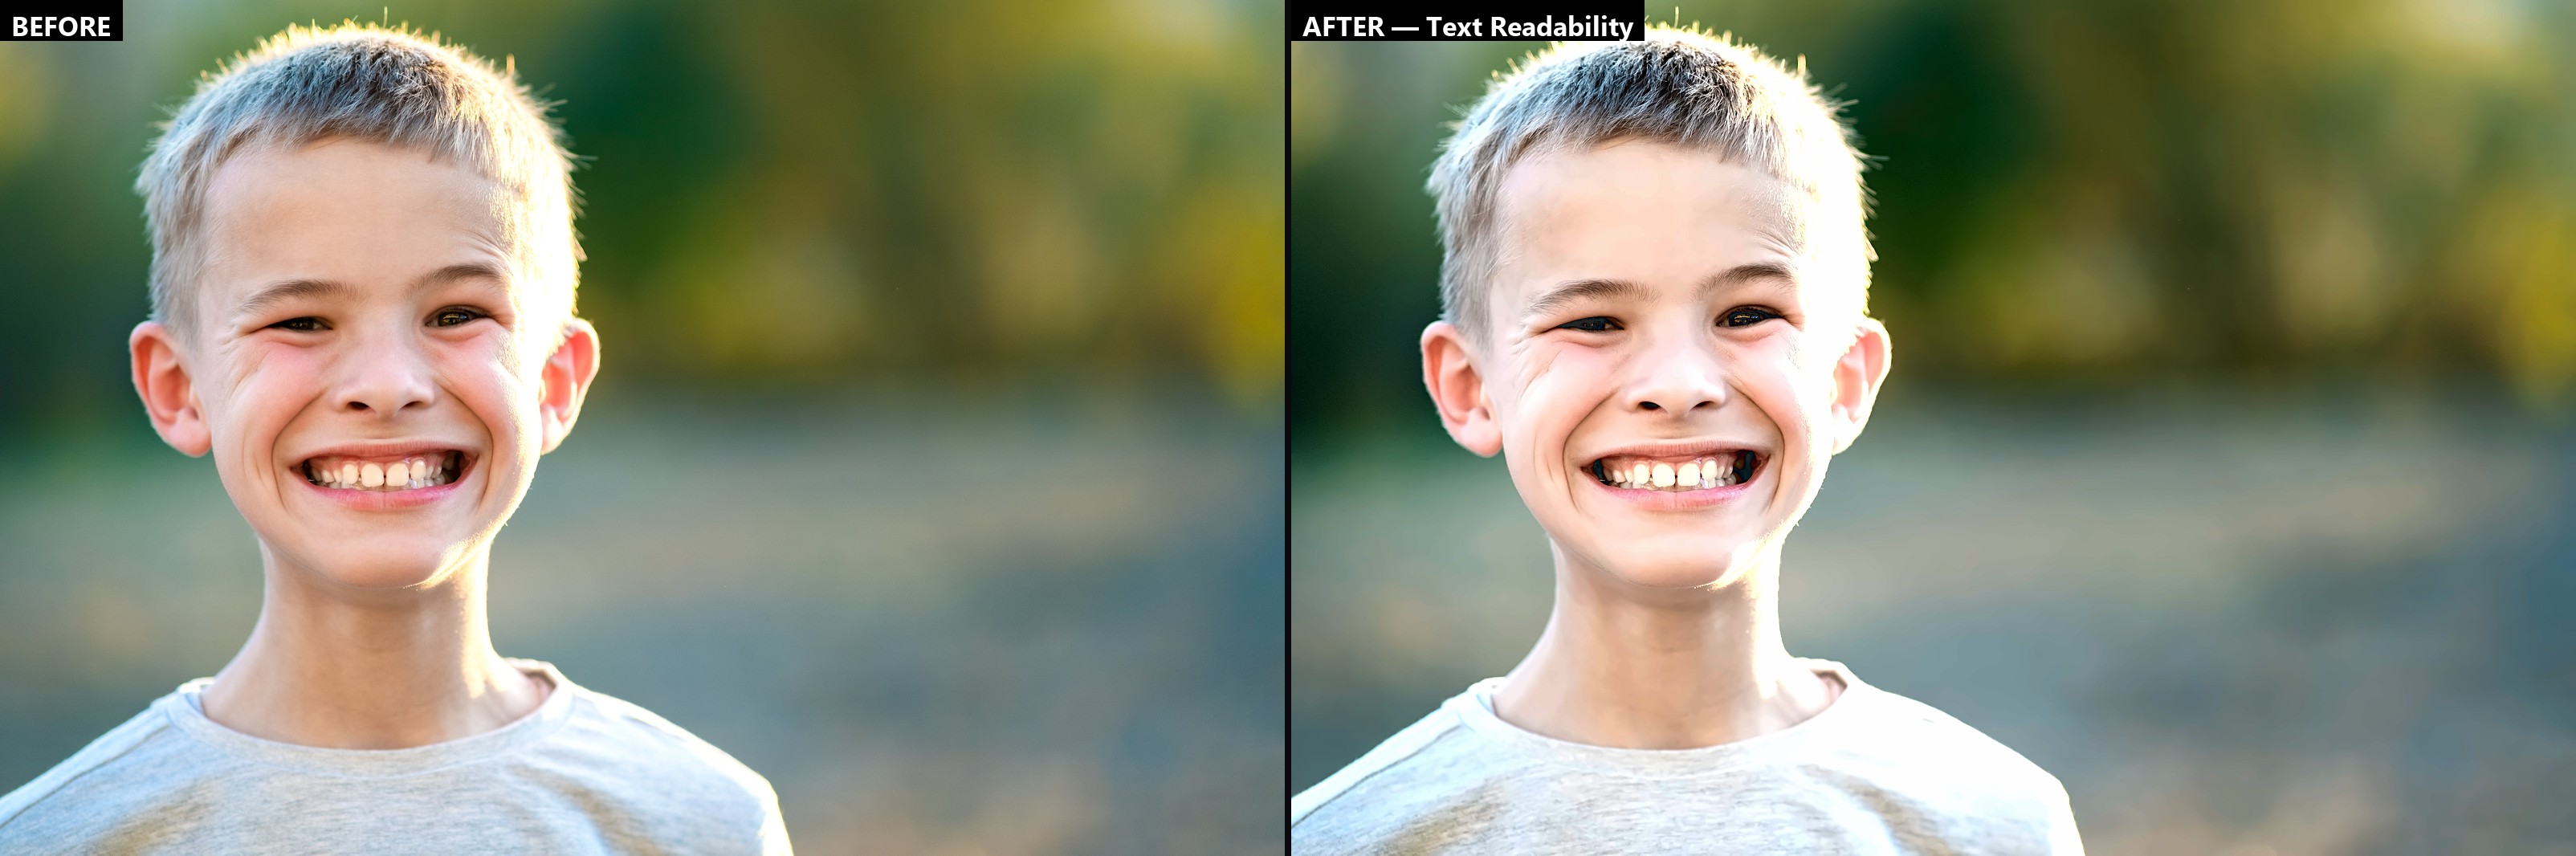
Every comparison below runs the app's real enhancement code on the same source photo —
not a hand-tuned approximation.
Vivid / Vibrant
Cinematic (High Contrast)
Warm / Golden Hour
Cool / Crisp
Vintage / Retro
HDR Detail
Portrait Soft
Cyberpunk (Neon)
Moody Dark
Airy / Pastel
Analog Film
AI (Natural Detail)
Text Readability
Every profile is a deterministic, describable color-grading recipe — temperature
shift, tint, contrast, saturation, adaptive local contrast, softening, and vignette — not a machine-learning
model. The same photo with the same profile always produces the same result.
Every control, explained 16 controls
Single / Multiple / Folder
The usual source-mode toggle, with Include subfolders in Folder mode. Only affects which files the batch run touches — the live preview always uses whichever single image you've selected in the queue.
Image Queue tab
Drag & drop or Add images here. Click a thumbnail to load it into the live preview. Remove / Clear manage the queue only, not files on disk.
Color Profile (Enhancement tab)
Picks one of the 13 built-in presets, or None to disable color grading and use only the manual sliders below.
Sharpness
Unsharp-mask strength — raises local edge contrast to make detail look crisper. Always applies, on top of whatever profile is selected.
Saturation
Scales color intensity. 100% = unchanged; lower is more muted, higher is more vivid.
Contrast
Widens or narrows the gap between an image's darkest and brightest tones.
Brightness
Shifts overall exposure up or down.
Denoise
Non-local-means noise reduction — smooths sensor grain/noise without blurring real detail as aggressively as a plain blur would. Higher values remove more noise but can soften fine texture.
Warmth (Advanced tab)
Shifts color temperature cooler (blue) or warmer (orange), additive on top of whatever the profile already set.
Tint + Tint Strength
Blends a chosen solid color over the image at the given strength — for a deliberate color cast beyond what warmth alone gives you.
Vignette
Darkens the corners/edges of the frame, drawing the eye toward the center.
Soften
Edge-preserving smoothing (bilateral filter) — softens skin/surfaces while keeping real edges sharp. Best for portraits.
Grain
Adds synthetic film grain — an aesthetic effect, the opposite of Denoise.
Save / Reset (Advanced tab)
Save stores your current slider combination as a reusable custom profile. Reset puts every Advanced slider back to its default (0/off).
Preview panel — Compare / Side by Side
Same as the Upscaler's preview — a draggable divider or a full side-by-side. Updates live on a short debounce as you move sliders.
Enhance Batch
Applies the current profile + slider combination to every image in the queue (or the whole folder), writing to the output folder with your chosen format.
Account & license
Settings & License
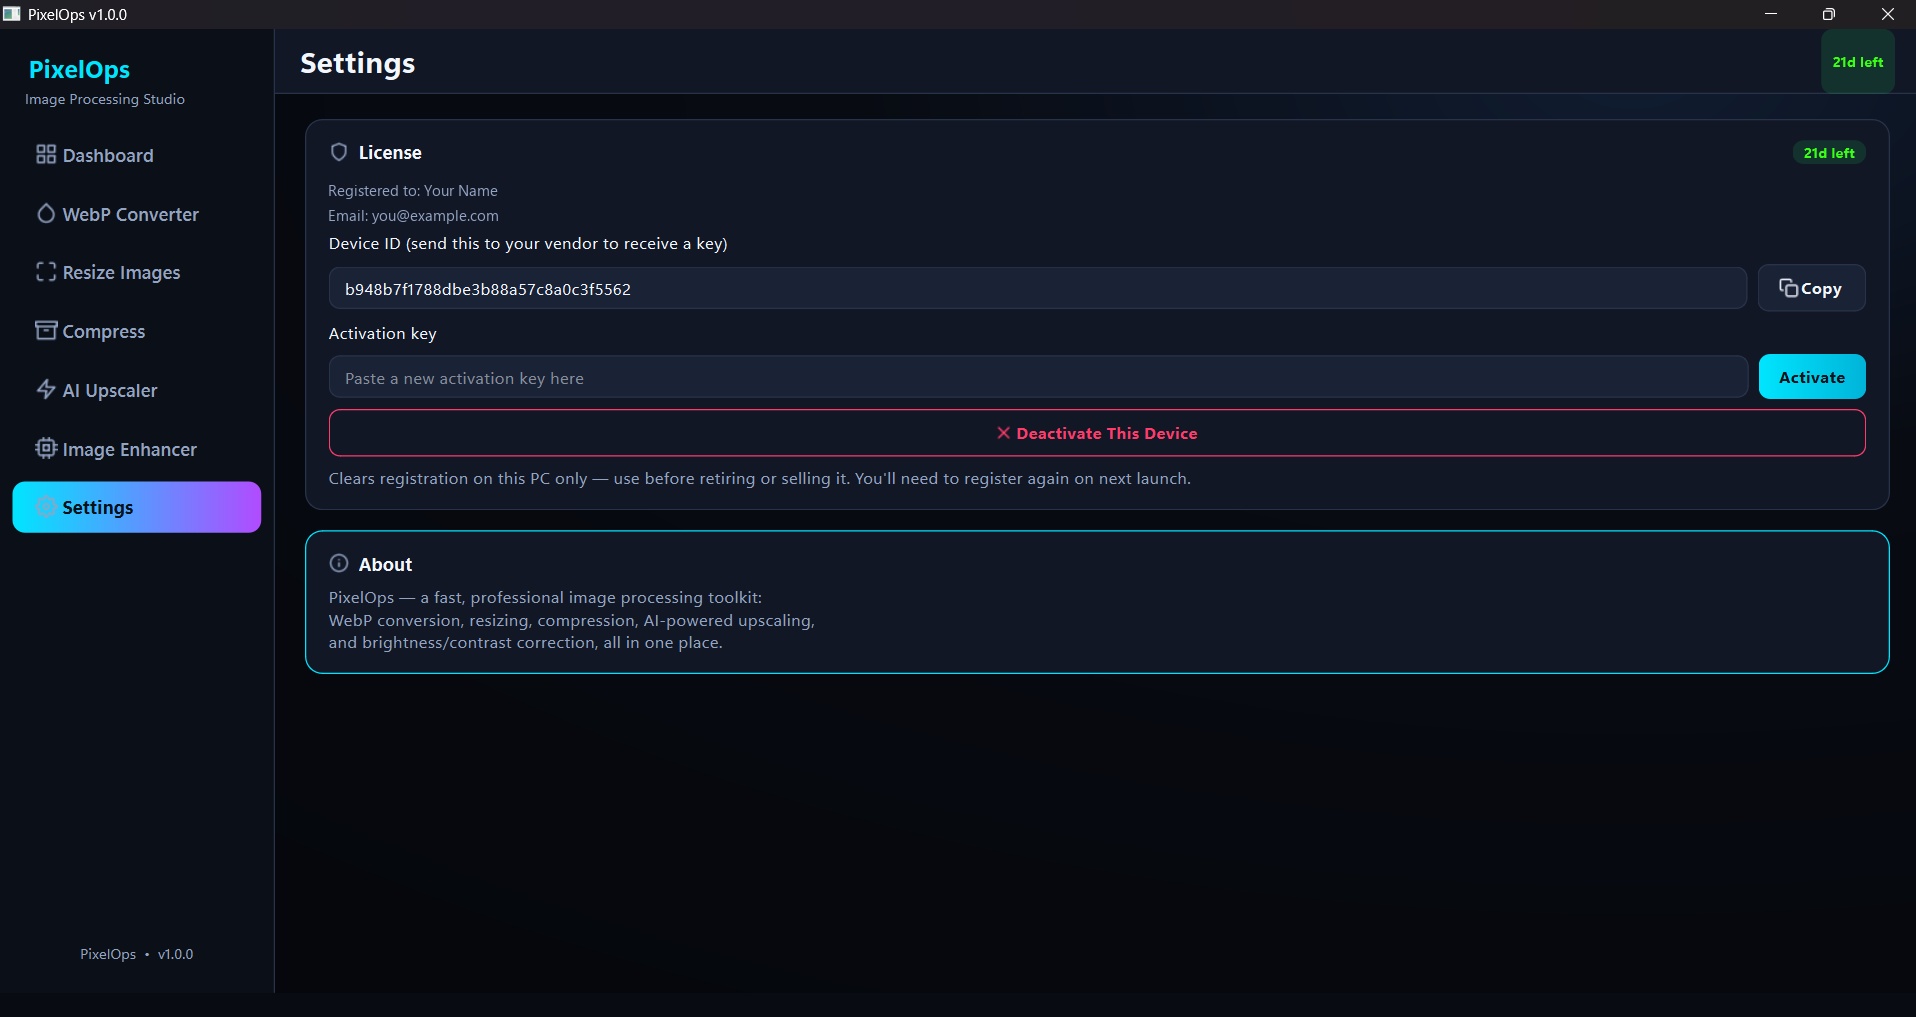
Everything about your license lives here — your Device ID, activating a new key, and
deactivating this PC.
Copy your Device ID
Needed any time you contact your vendor for a key — click Copy and paste it into your
message to them.
Activate a new key
Paste a key here at any time — while on a trial, or to replace/renew an existing license.
License details, at a glance: Settings now shows your license name, email,
and exact days remaining — not just "Licensed" — for both trial and activated keys.
Deactivate This Device clears PixelOps' registration on this PC only.
Use it before retiring or selling the computer — you'll simply register again (trial or key) the next
time PixelOps opens.
Every control, explained 6 controls
License badge
Top-right status pill — shows Active/Trial/Expired/Revoked at a glance, matching the badge on the Dashboard.
Registered to (name / email)
Only shown once your license has been verified against the server — displays who the license is actually registered to, not just a generic "Licensed."
Device ID + Copy
A per-machine identifier, unique to this PC. Send it to your vendor when requesting or renewing an activation key. Copy puts it straight on your clipboard.
Activation key + Activate
Paste a key here at any time — while on a trial, to renew, or to replace an existing license — then click Activate to apply it immediately, no restart needed.
Deactivate This Device
Clears this PC's registration only (doesn't revoke the key itself). Use before retiring or selling the computer, or to free up a device slot on a multi-device key.
About card
Static reference text confirming the current tool lineup — informational only, no controls.
Troubleshooting
Antivirus flagged or deleted PixelOps.exe?
Some antivirus tools (Quick Heal, Malwarebytes, Windows Defender, and others) can
mistakenly quarantine or delete PixelOps.exe. This is a false positive, not a real detection —
PixelOps contains no malicious code.
Why this happens: PixelOps isn't currently code-signed, and — like
many small Windows applications built with Python — its installer bundles a runtime component that
decrypts application code when the app starts. That combination (unsigned + a self-decrypting
component) matches the general pattern antivirus heuristics use to flag "packed" software, even
though nothing about it is actually harmful. This is a widely reported issue across many legitimate,
independently published Windows apps, not something specific to your PC.
1. Restore it from quarantine
Most antivirus tools quarantine rather than permanently delete. Open your antivirus's
quarantine/protection history, find PixelOps.exe, and choose Restore.
2. Add an exclusion
Add the install folder — typically C:\Program Files\PixelOps — as an exclusion in
your antivirus settings, so it won't be re-flagged or removed again on future scans.
3. Report it as a false positive
Most antivirus vendors have a false-positive submission page (or a "Submit for analysis" button
right in the quarantine list). Reporting it helps get this exact file whitelisted, usually within
a few days.
4. Still stuck?
Email support@neuronq.in with your antivirus's name and
version — we'll help directly.
Note: re-downloading or reinstalling PixelOps does not fix this on its own
— the file that was removed needs to be restored or excluded using the steps above, since a fresh
download can trigger the exact same false positive.